User Guide
Welcome to Docedex
Taking control of hospital administrative management is just a few keystrokes away!
Docedex is a desktop application built for medical administrative assistants to manage doctors and patients within clinics.
Here’s an overview of how Docedex can help you streamline your hospital management processes.
- Store and edit information about your patients and doctors
- Track the status of your patients and doctors
- Assign patients to doctors upon triaging
On top of these functionalities, we believe that patient management must be efficient. Therefore, Docedex is optimized for use via a Command Line Interface (CLI) while still having the benefits of a Graphical User Interface (GUI). If you type fast, Docedex can get your hospital management tasks done faster than current GUI apps in the industry.
If you are new here, visit our quick start guide to onboard onto Docedex smoothly!
Table of Contents
- Quick start
- Glossary
- Command format
- Command Summary
- Navigating the Graphical User Interface (GUI)
- Notes about the command format
- Command Summary
- Docedex Tutorial (for new users)
- Features
- FAQ
Quick start
- Make sure that you have Java 11 or above installed on your computer.
- Download the latest jar file (
docedex.jar) from our Github Releases.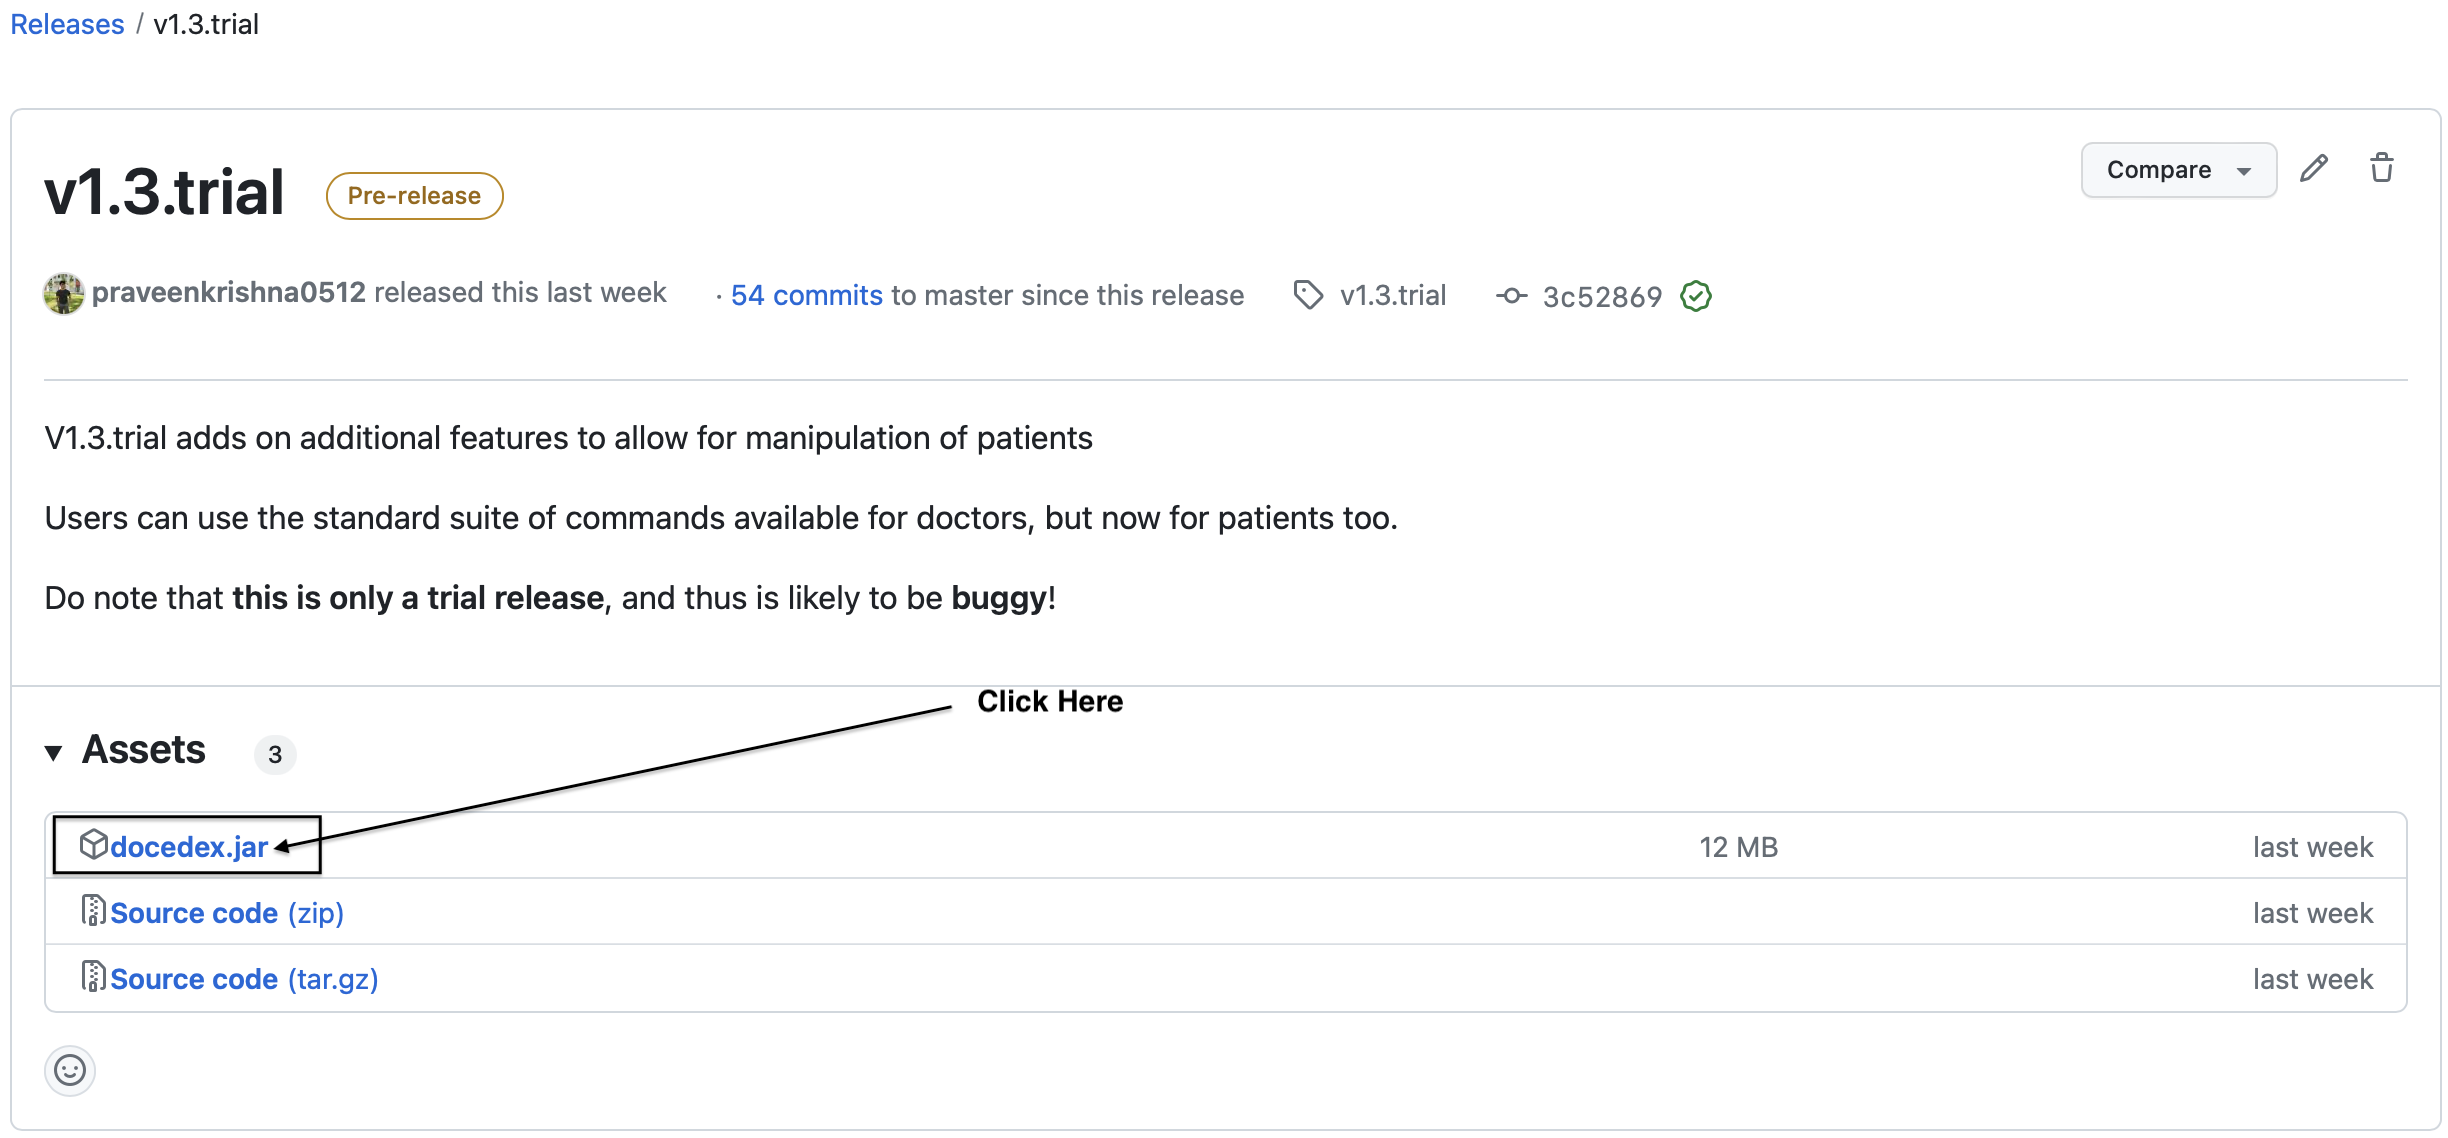
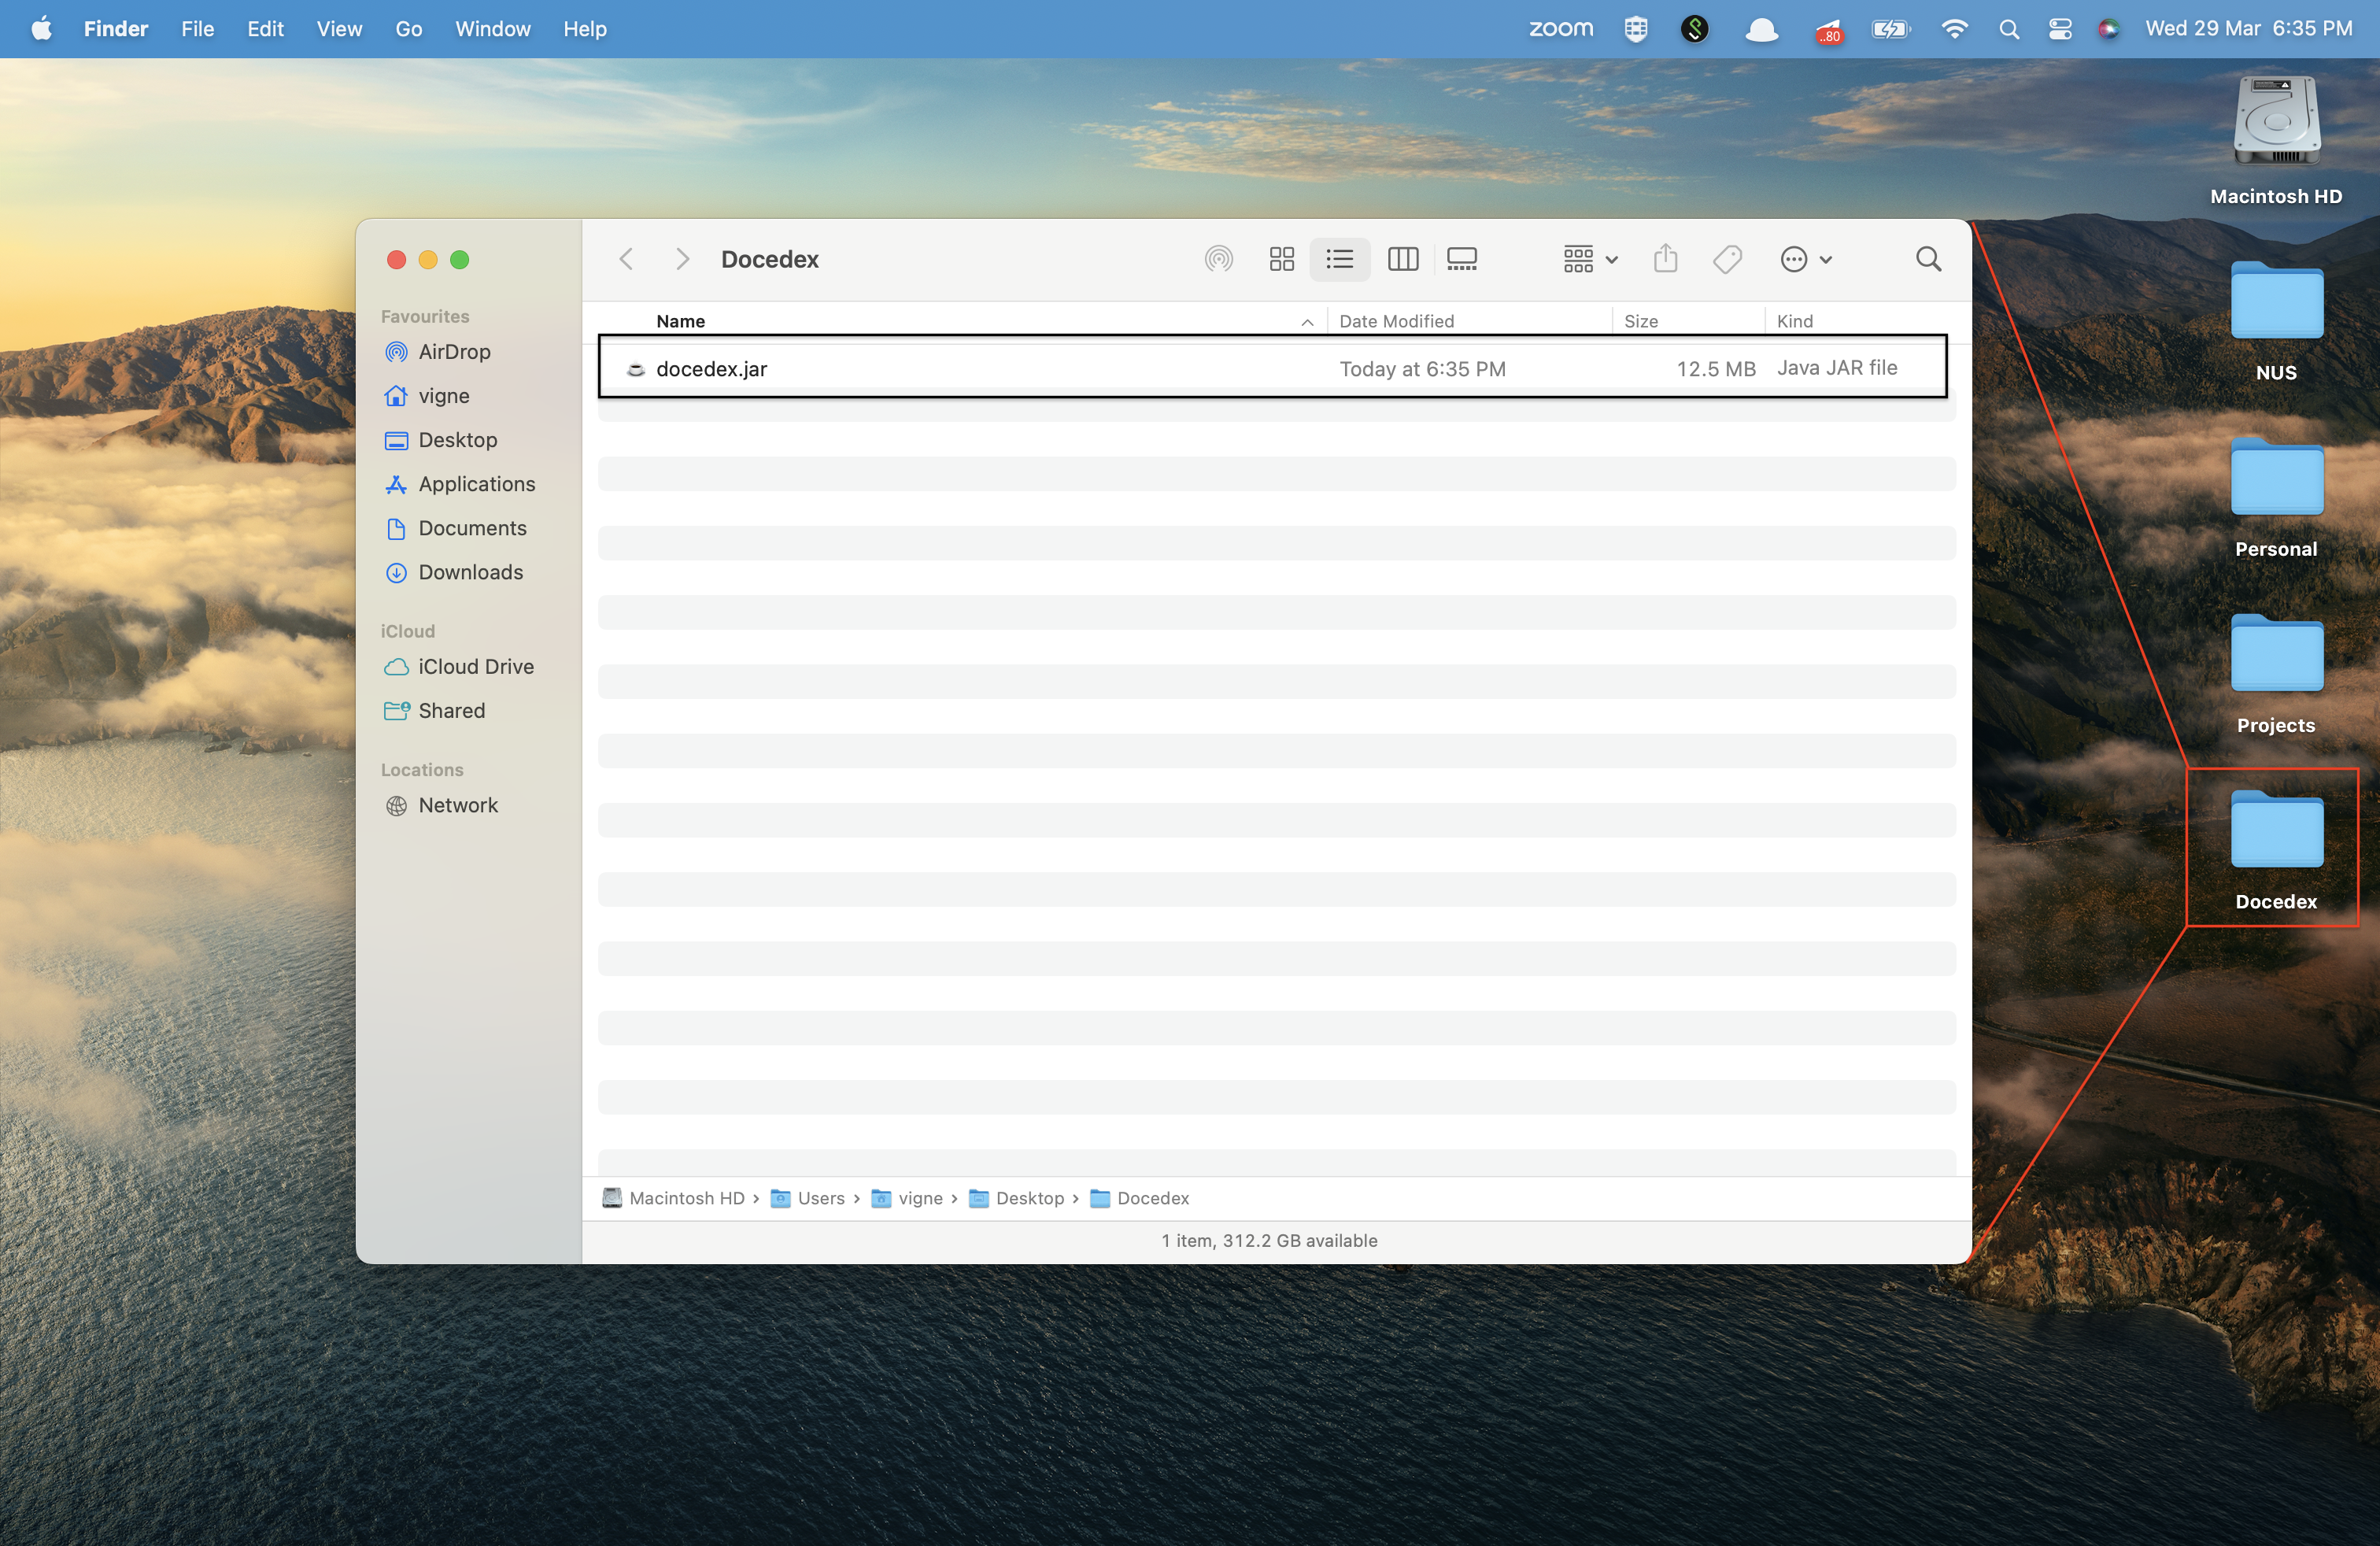
- Move the jar file to a folder where you want to store the data of the doctors and patients.
- Create a new folder called (you can name it Docedex) where you would like to house the application (e.g., Desktop, Documents, etc.).
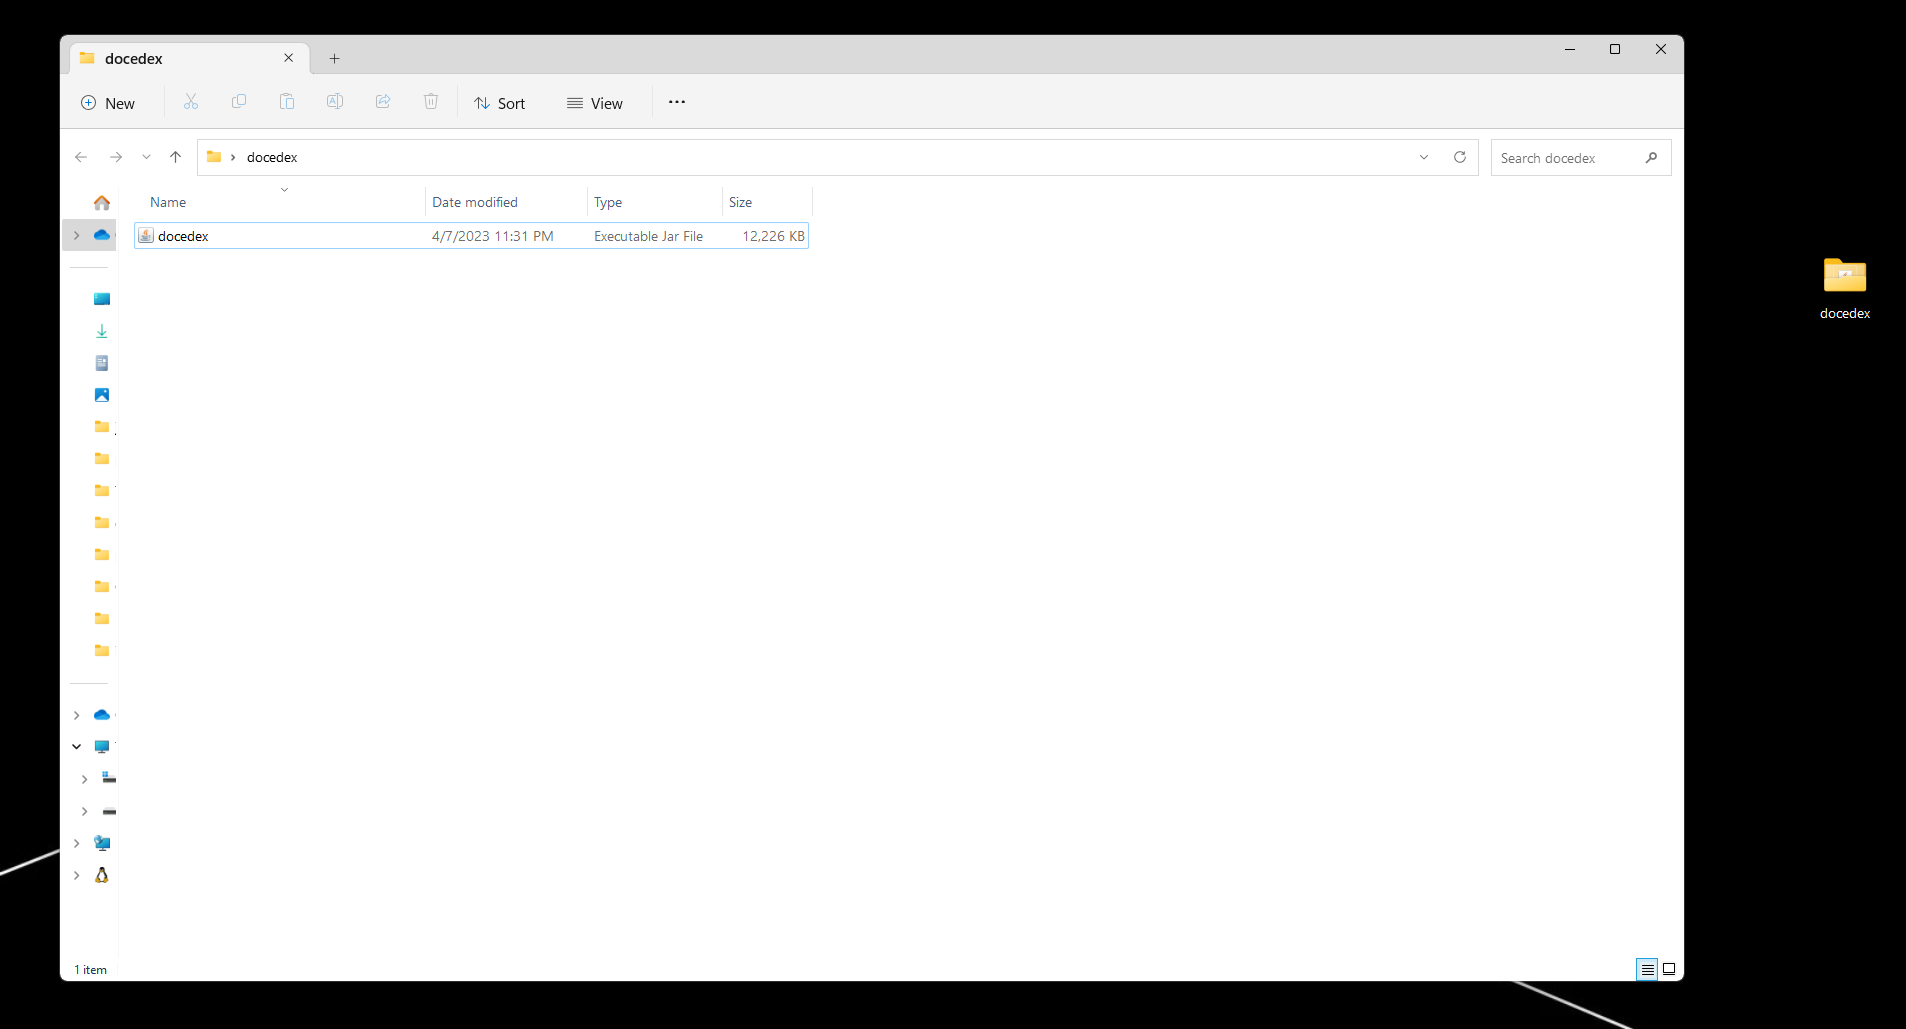
- Move the downloaded jar file to this folder as shown below.
- For Mac Users:
- For Windows Users:
- For Mac Users:
- Launch Docedex
- For Mac Users:
- Open a new Terminal window (Command + Space > type Terminal > Enter).
- Navigate to the folder where you have stored the jar file using the
cdcommand.
- For example, if you have stored the jar file in a folder called Docedex, you can type
cd Docedexand press Enter. - Typejava -jar docedex.jarand press Enter.
- For Mac Users:
- Right-click
docedex.jar > Open With > JavaLauncher.app
- First time users may be prompted with a warning that the file was downloaded from the Internet. Simply click Open in the prompt to continue.
- For Windows Users:
- Double-click
docedex.jarto launch the application.
- Double-click
- If this still does not work follow the instructions listed here.
- You should notice the GUI of the application pop up.
Scroll back to Table of Contents
Glossary
Definitions
Here are some descriptions of the words we use throughout the User Guide:
| Term | Definition |
|---|---|
| Parameter | Parameters are like fields in a form you are required to fill up. They include details you would include about the doctor/patient. |
| Command | An input from the user that tells Docedex to perform an action (ie. add a doctor). |
| GUI | Graphical User Interface (GUI) represents the visual display of Docedex that users can see. |
| GUI component | A subsection of the Graphical User Interface. For more information on specific GUI components, refer to this section. |
| CLI | Command Line Interface (CLI) represents a text-based user interface to interact with the application. |
Parameter Information
The information below specifies parameter description, constraints and usage through valid and invalid examples.
Common Parameters
| Parameter | Description | Constraints | Valid Examples | Invalid Examples |
|---|---|---|---|---|
| n/ | Name of the doctor/patient | Alphanumeric characters (a to z, A to Z, 0 to 9) | Will Hunting, Elizabeth 2 | 成龍, 潔 いさぎ 世 よ 一 いち, Ganesh s/o Ravichandran |
| e/ | Email of the doctor/patient | Email prefix: Alphanumeric characters (a to z, A to Z, 0 to 9), @, Email Domain | whunting@gmail.com, eliz2@mit.edu | whunting@, eliz2 |
| p/ | Phone number of the doctor/patient | Positive integer with 3 or more digits | 999, 94565625 | 0, -1 |
| t/ | Tags (optional parameter) | Single string of characters not separated by any whitespace | pendingReview, recurrentProblem | N/A |
| INDEX* | Index in doctors/patients list | Positive integer less than or equal to 2147483649 | 1, 2147483647 | -1, 2147483649 |
*Index is prefaced by doc/ and ptn/ in the commands assign-ptn and unassign-ptn
Doctor Parameters
| Parameter | Description | Constraints | Valid Examples | Invalid Examples |
|---|---|---|---|---|
| s/ | Specialty of the doctor | Alphanumeric characters (a to z, A to Z, 1 to 9) | Cardiology, Neurology | N/A (45 specialties are recognized in Singapore) |
| y/ | Years of experience | Positive integer between 0 and 99. | 0, 99 | -1, 100 |
Patient Parameters
| Parameter | Description | Constraints | Valid Examples | Invalid Examples |
|---|---|---|---|---|
| h/ | Height of the patient in metres (m) | 3-digit number with 2 decimal places representing patient’s height in metres | 1.63, 1.99 | 1, 1.2, 1.234 |
| w/ | Weight of the patient in kilograms (kg) | Number with an optional 1 decimal place representing patient’s weight in kg | 85.0, 63.2 | -85, 63.20 |
| d/ | Diagnosis | Alphanumeric characters (a to z, A to Z, 0 to 9) | Fever, Cancer | 发烧 |
| st/ | Status | Can only take one of the following values: Inpatient, Outpatient, Observation, Emergency Department, Intensive Care Unit, Transitional Care | Inpatient, Outpatient | Baymax, HelloWorld |
Command format
| Format | Explanation | Examples |
|---|---|---|
Words in UPPER_CASE
|
These are parameter values that are supplied by the user |
add-doc n/NAME... can be used as add-doc n/John Doe...
|
| Items in square brackets | These are optional parameters (can be left empty by user) |
add-doc n/NAME ... [t/TAG] can be used as add-doc n/John Doe t/friend or add-doc n/John Doe
|
Items with … after them |
These are parameters that can be used multiple times (or omitted completely) |
add-doc ... [t/TAG]… can be used as add-doc ... t/friend t/surgeon or add-doc ...
|
| Parameters can be in any order. | N/A |
add-doc n/NAME p/PHONE_NUMBER ... is equivalent to add-doc p/PHONE_NUMBER n/NAME
|
| If a parameter is expected only once and entered multiple times, only the latest occurrence is accepted. | N/A |
add-doc n/John Doe n/Shawn Koh ... is equivalent to add-doc n/Shawn Koh ...
|
| Extraneous parameters for commands that do not take in parameters will be ignored. | N/A |
help 123, list 123 is equivalent to help or list
|
Scroll back to Table of Contents
Command Summary
| Command | Shorthand | What it does |
|---|---|---|
add-doc / add-ptn |
ad / ap |
Adds a doctor or patient into Docedex. |
edit-doc / edit-ptn |
ed / ep |
Edits the specified doctor or patient. |
del-doc / del-ptn |
dd / dp |
Removes the specified doctor or patient from Docedex. This action cannot be undone. |
find-doc / find-ptn |
fd / fp |
Finds the doctor(s) and patient(s) which matches the search query. |
list-doc / list-ptn |
lsd / lsp |
Lists all doctors or patients. |
assign-ptn |
asn |
Assigns a patient to a doctor. |
unassign-ptn |
uasn |
Unassigns a patient from a doctor. |
sd / sp |
sd / sp |
Selects the specified doctor or patient and displays the person’s information on the GUI. |
help |
N/A | Displays the link to the User Guide. |
clear |
N/A | Clears all entries from Docedex. This action cannot be undone. |
exit |
N/A | Exits the application (equivalent to closing the application). |
Scroll back to Table of Contents
Navigating the Graphical User Interface (GUI)
Docedex comes with a GUI to allow for a nice visual feedback for our users. Here is a quick runthrough of the different sections of our GUI, as well as some notes regarding the use of the GUI.
Quick Orientation
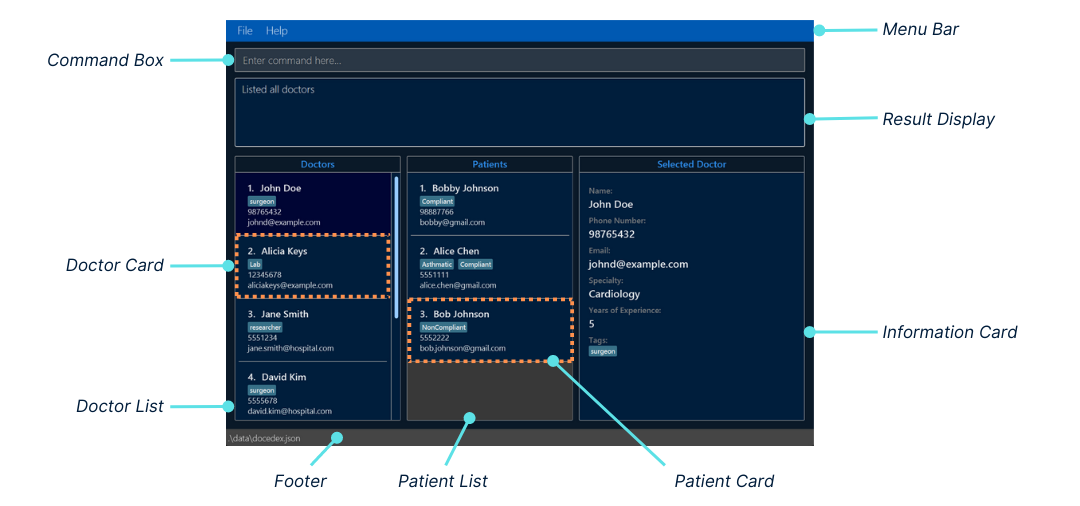
Here is a quick summary of each GUI component within Docedex.
| Name of component | Description |
|---|---|
| Menu Bar | Contains dropdown menu options for the Docedex application. |
| Command Box | Allows users to enter Docedex commands. |
| Result Display | Provides CLI-based feedback upon a user command. Allows users to see if their command was successful or not. Provides error messages to guide user on how to use Docedex commands. |
| Doctor List | Shows a list of Doctor Cards. This list can be manipulated through commands. Upon starting the app, this list will reflect all doctors in Docedex. Upon selection of a Patient Card, this list will filter to show doctors assigned to said patient. |
| Doctor Card | Displays key information about a doctor, such as name, phone number, email and tags. |
| Patient List | Shows a list of Patient Cards. This list can be manipulated through commands. Upon starting the app, this list will reflect all patients in Docedex. Upon selection of a Doctor Card, this list will filter to show patients assigned to said doctor. |
| Patient Card | Displays key information about a patient, such as name, phone number, email and tags. |
| Information Card | Displays all information about a selected doctor or patient. |
| Footer | Shows the location of the Docedex storage. |
Notes about the GUI
Selecting doctors or patients through commands
Certain commands involve the selection of doctors and patients immediately after they are entered.
For example, when you type in the add-doc command, Docedex will automatically select
the newly added doctor and display their details to you. This gives the user (you!)
a nice visual feedback that the command is successful.
Upon selecting a doctor, the Patient List displays the patients assigned to the selected doctor. However, if the doctor is newly added, said doctor will have no patients, and thus the Patient List will be empty.
This behaviour will also exist if the user adds a patient instead too.
Fret not, as this is part of the functionality of Docedex.
Your storage is still secure.
Unselecting doctors or patients
Unselecting doctors and patients is currently not supported in Docedex. If you wish to
look through all the doctors and patients in Docedex, please use the
list-doc and list-ptn commands instead.
Scroll back to Table of Contents
Notes about the command format
| Notes | Explanation | Examples |
|---|---|---|
Words in UPPER_CASE
|
These are parameter values that are supplied by the user |
add-doc n/NAME... can be used as add-doc n/John Doe...
|
| Items in square brackets | These are optional parameters (can be left empty by user) |
add-doc n/NAME ... [t/TAG] can be used as add-doc n/John Doe t/friend or add-doc n/John Doe
|
Items with … after them |
These are parameters that can be used multiple times (or omitted completely) |
add-doc ... [t/TAG]… can be used as add-doc ... t/friend t/surgeon or add-doc ...
|
| Parameters can be in any order. | N/A |
add-doc n/NAME p/PHONE_NUMBER ... is equivalent to add-doc p/PHONE_NUMBER n/NAME
|
| If a parameter is expected only once and entered multiple times, only the latest occurrence is accepted. | N/A |
add-doc n/John Doe n/Shawn Koh ... is equivalent to add-doc n/Shawn Koh ...
|
| Extraneous parameters for commands that do not take in parameters will be ignored. | N/A |
help 123, list 123 is equivalent to help or list
|
Scroll back to Table of Contents
Command Summary
| Command | Shorthand | What it does |
|---|---|---|
add-doc / add-ptn |
ad / ap |
Adds a doctor or patient into Docedex. |
edit-doc / edit-ptn |
ed / ep |
Edits the specified doctor or patient. |
del-doc / del-ptn |
dd / dp |
Removes the specified doctor or patient from Docedex. This action cannot be undone. |
find-doc / find-ptn |
fd / fp |
Finds the doctor(s) and patient(s) which matches the search query. |
list-doc / list-ptn |
lsd / lsp |
Lists all doctors or patients. |
assign-ptn |
asn |
Assigns a patient to a doctor. |
unassign-ptn |
uasn |
Unassigns a patient from a doctor. |
sd / sp |
sd / sp |
Selects the specified doctor or patient and displays the person’s information on the GUI. |
help |
N/A | Displays the link to the User Guide. |
clear |
N/A | Clears all entries from Docedex. This action cannot be undone. |
exit |
N/A | Exits the application (equivalent to closing the application). |
Scroll back to Table of Contents
Docedex Tutorial (for new users)
This is a tutorial for first-time Docedex users.
- Launch Docedex. You may refer to the instructions here
- Note: On launch, Docedex will not contain any doctor or patient records.
- Let us try adding a doctor to our Docedex. Enter the command
add-doc n/John Doe p/98765432 e/johnd@example.com s/Cardiology y/5 t/surgeonin the command box.- Note: On adding a new doctor, the patients’ list is filtered to show only patients associated with the doctor. To view all patient records, simply type
list-ptnin the command box.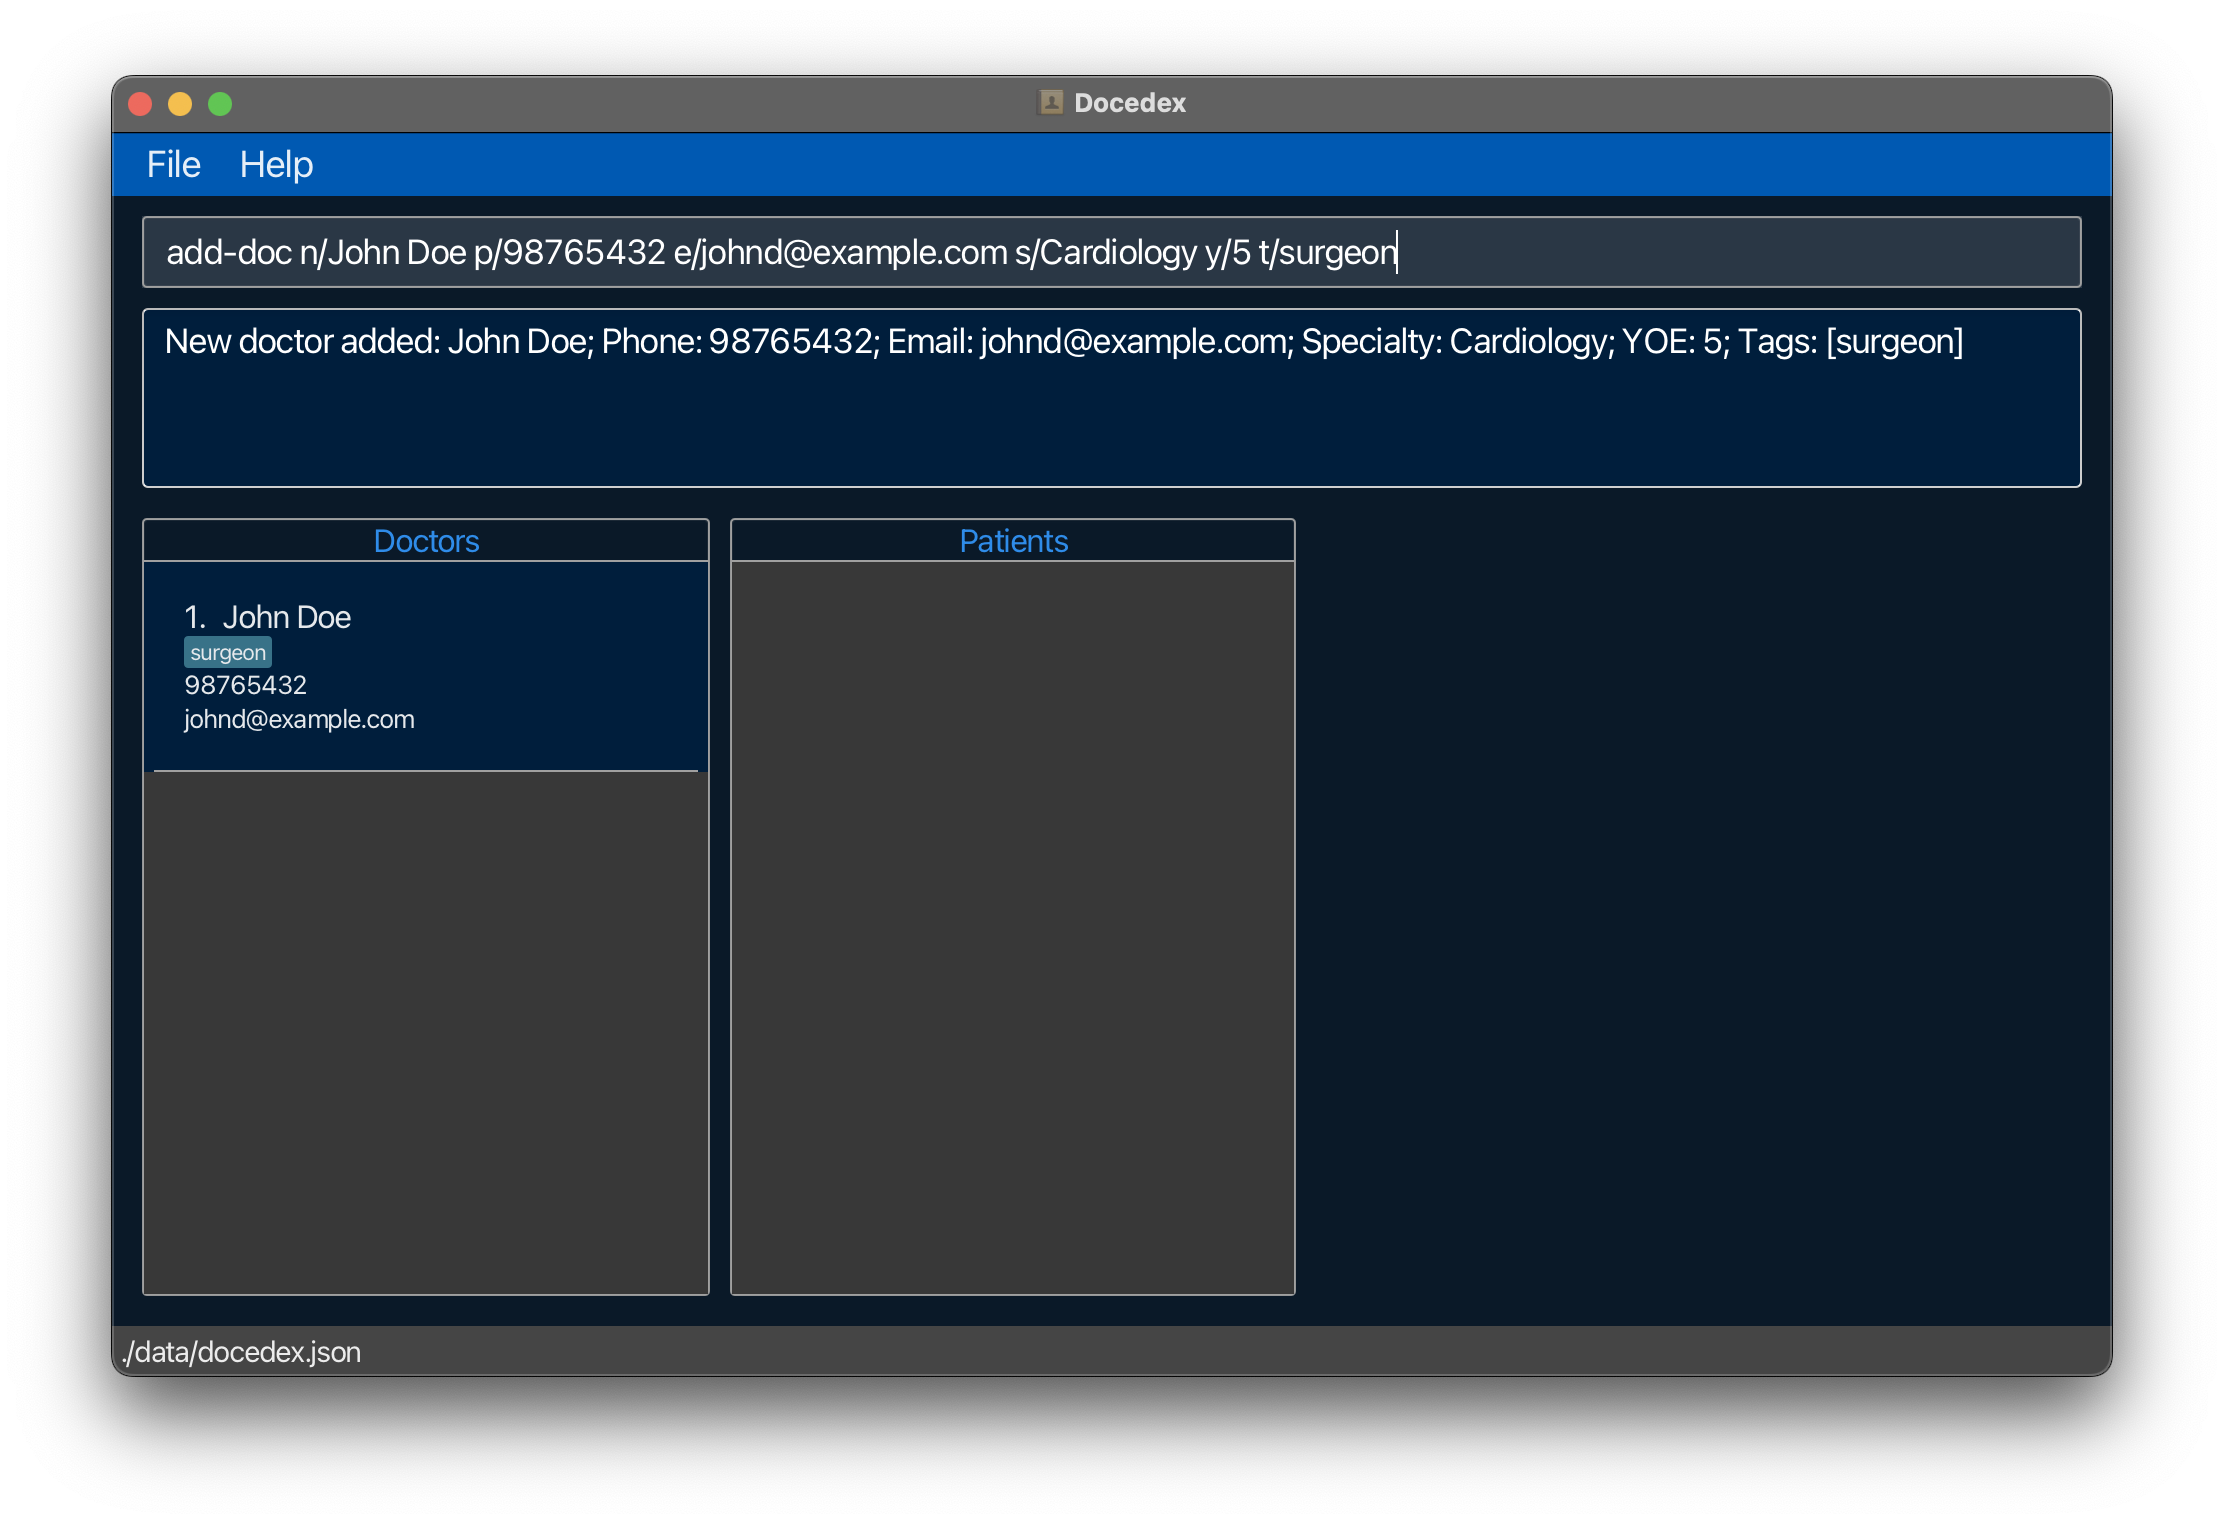
- Note: On adding a new doctor, the patients’ list is filtered to show only patients associated with the doctor. To view all patient records, simply type
- Let us try adding a patient to our Docedex. Enter the command
add-ptn n/Patrick Bateman p/85167604 e/psigma@gmail.com h/1.88 w/80.5 d/Rhinitis st/Outpatient r/Dust allergy t/pendingReviewin the command box.- Note: On adding a new patient, the doctors’ list is filtered to show only doctors associated with the patient. To view all doctor records, simply type
list-docin the command box.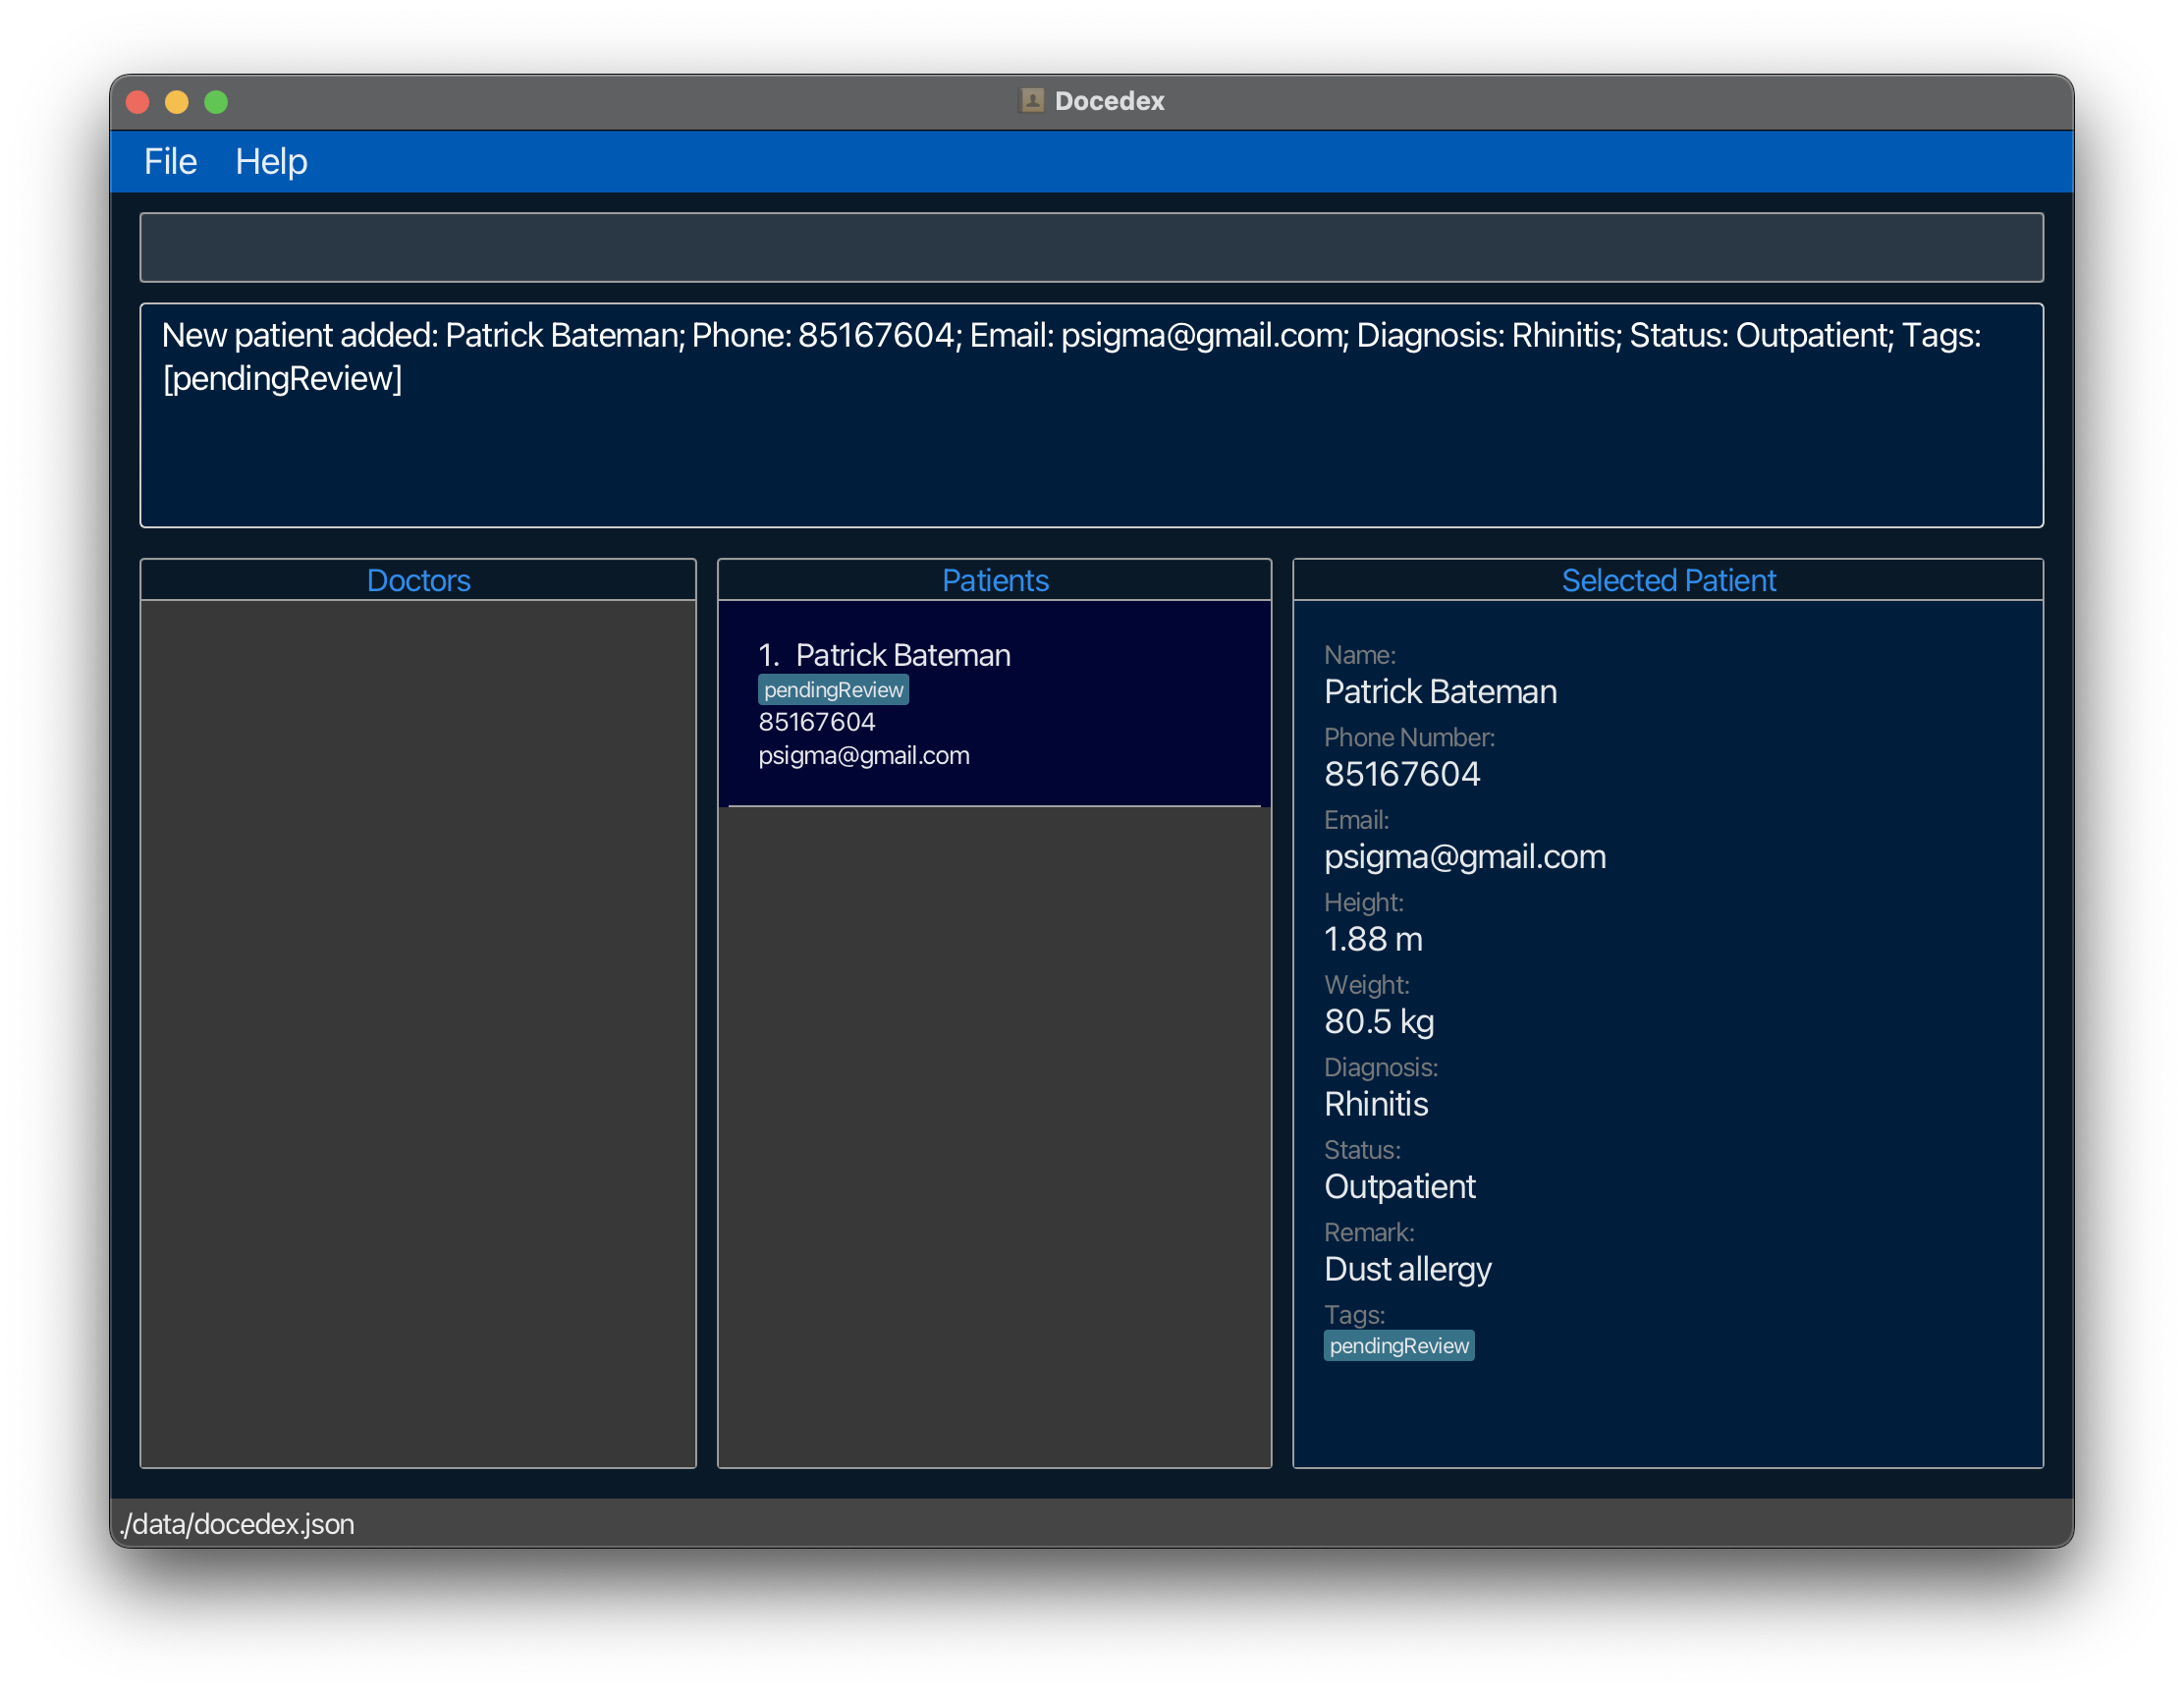
- Note: On adding a new patient, the doctors’ list is filtered to show only doctors associated with the patient. To view all doctor records, simply type
- Add a few more doctors and patients to Docedex!
- Let us try assigning the patient to the doctor. Enter the command
assign-ptn ptn/1 doc/1in the command box.- Note: On assigning a patient to a doctor, the doctors’ list is filtered to show only doctors associated with the patient. To view all doctor records, simply type
list-docin the command box.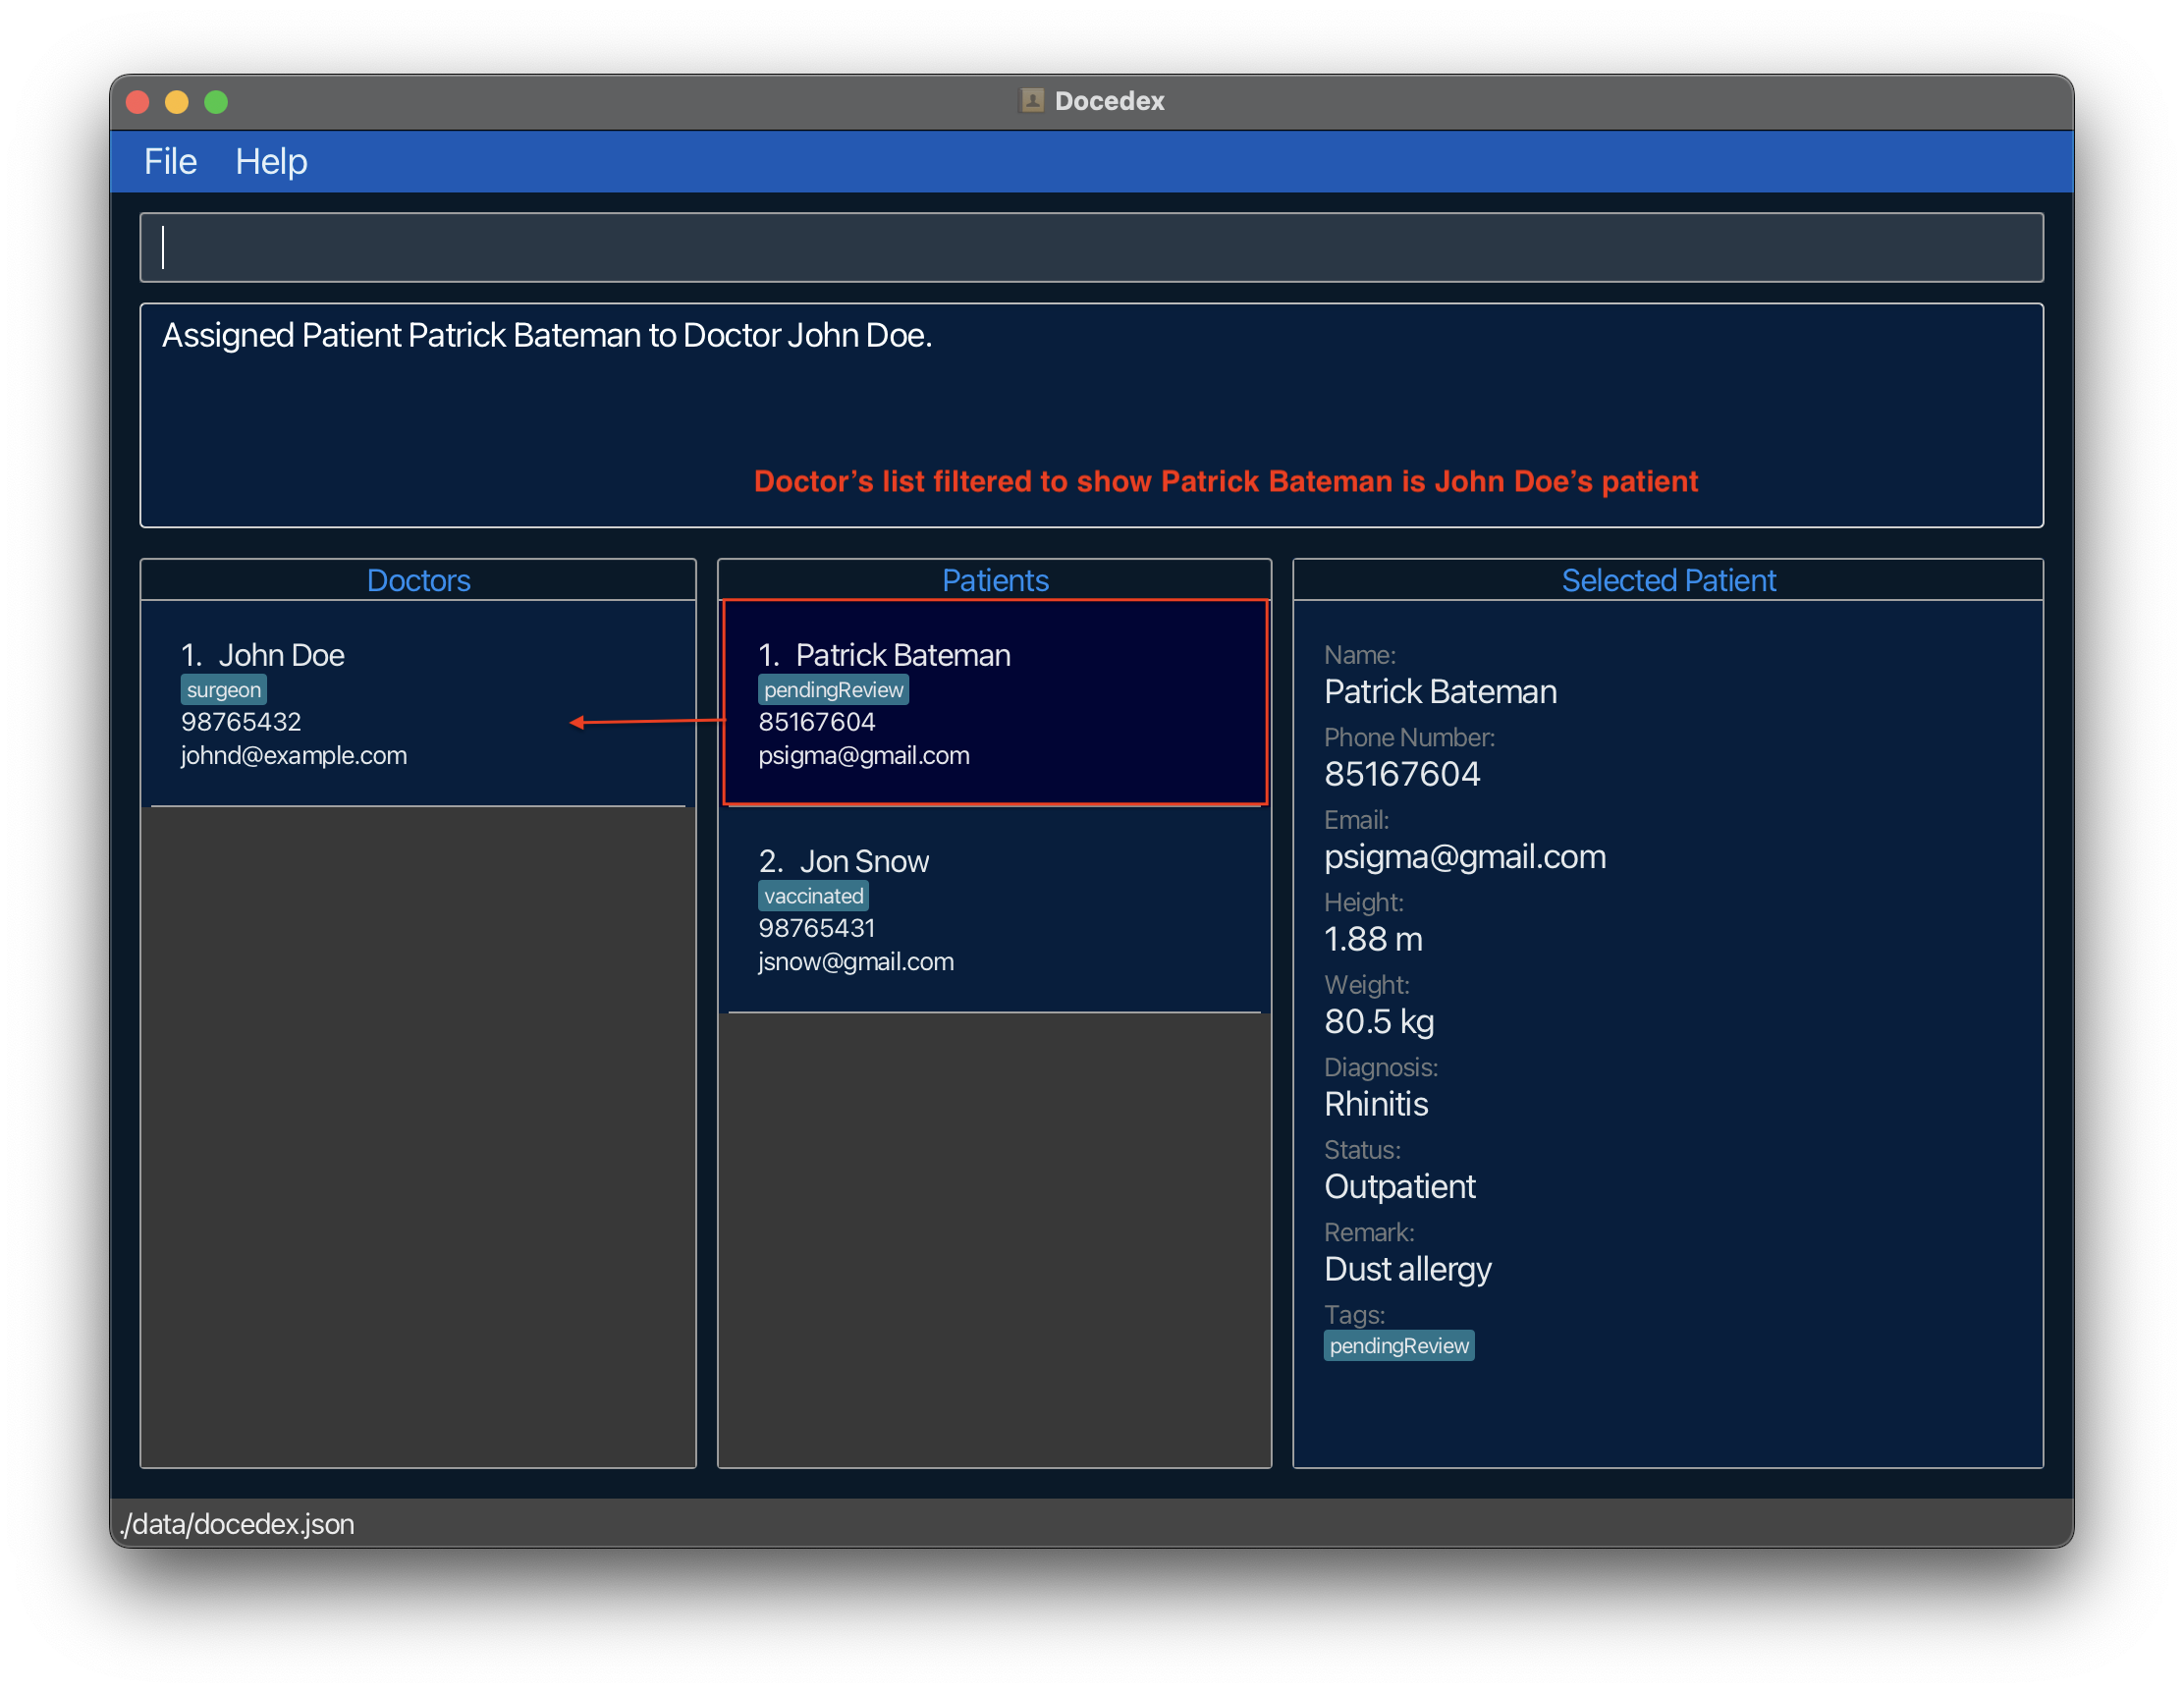
- Note: On assigning a patient to a doctor, the doctors’ list is filtered to show only doctors associated with the patient. To view all doctor records, simply type
- Let us try selecting the doctor. Enter the command
sd 1in the command box.- Note: On selecting the doctor, the patients’ list is filtered to display only patients associated with the doctor. To view all patients use
list-ptn.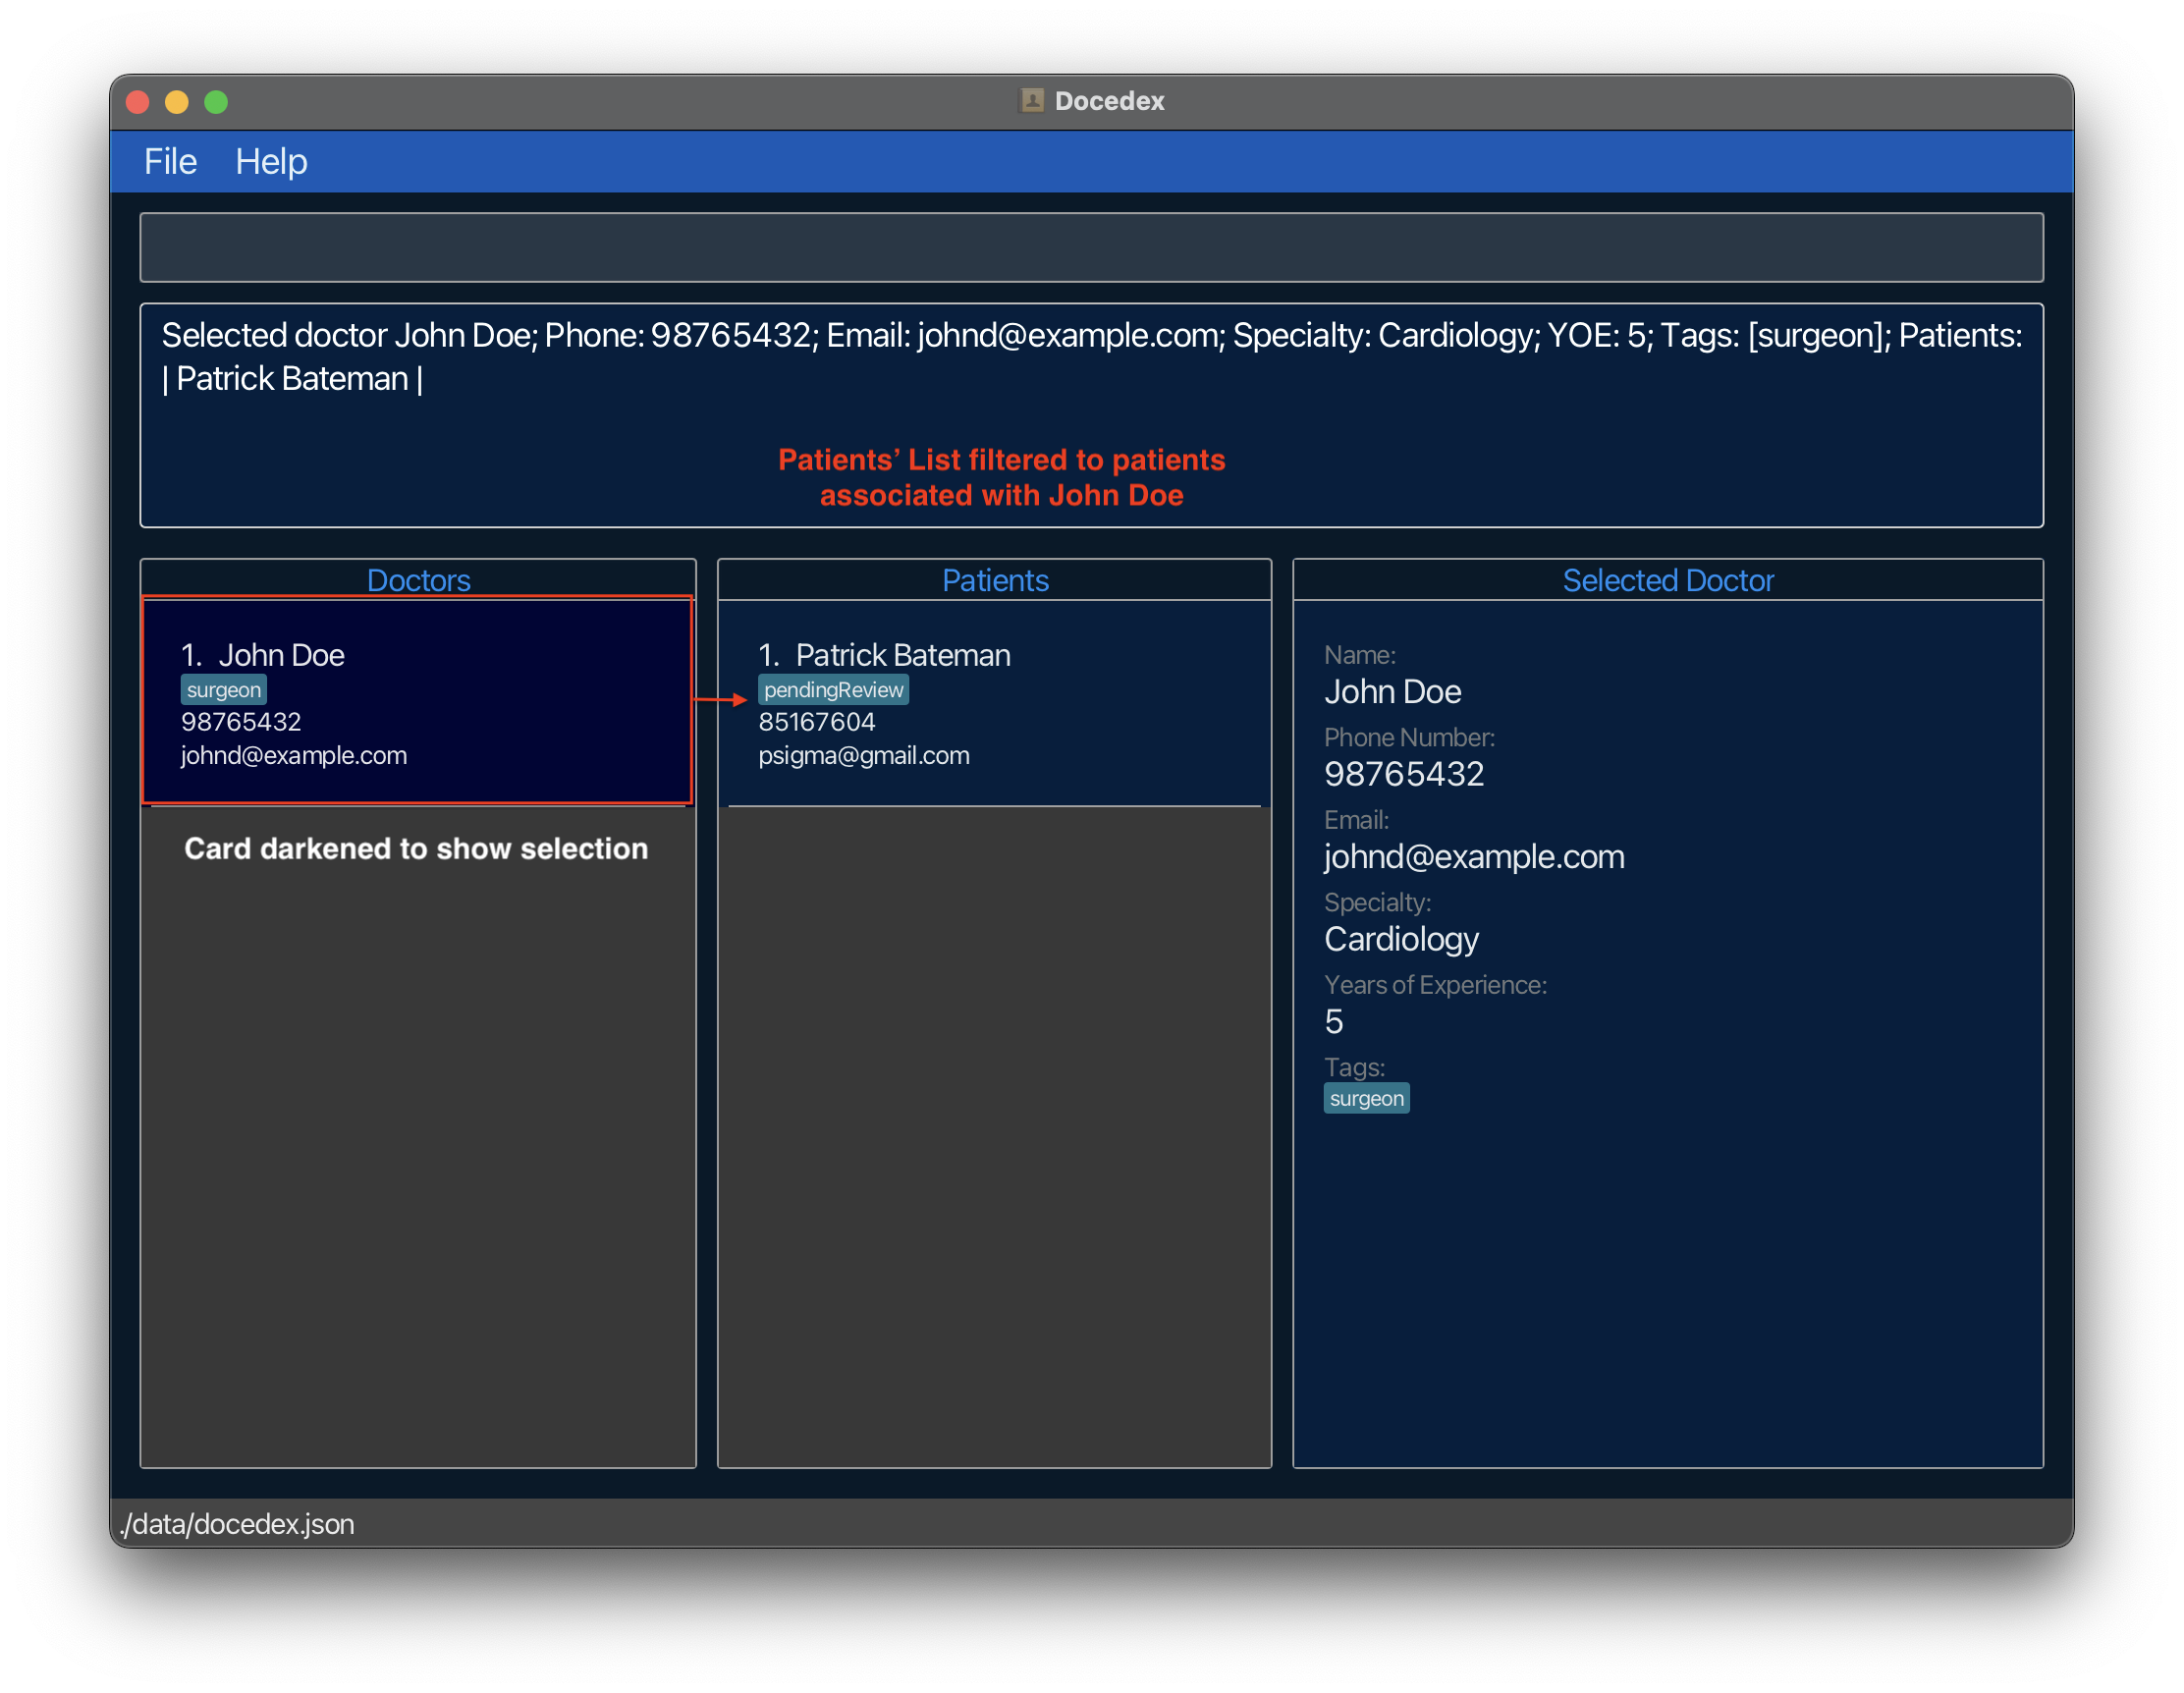
- Note: On selecting the doctor, the patients’ list is filtered to display only patients associated with the doctor. To view all patients use
- Let us try selecting the patient. Enter the command
sp 1in the command box. This time, the doctors’ list is filtered instead.- Note: On selecting the patient, the doctors’ list is filtered to display only patients associated with the patient. To view all doctors use
list-doc.
- Note: On selecting the patient, the doctors’ list is filtered to display only patients associated with the patient. To view all doctors use
- Let us try undoing the assignment of the patient from the doctor. Enter the command
unassign-ptn ptn/1 doc/1in the command box.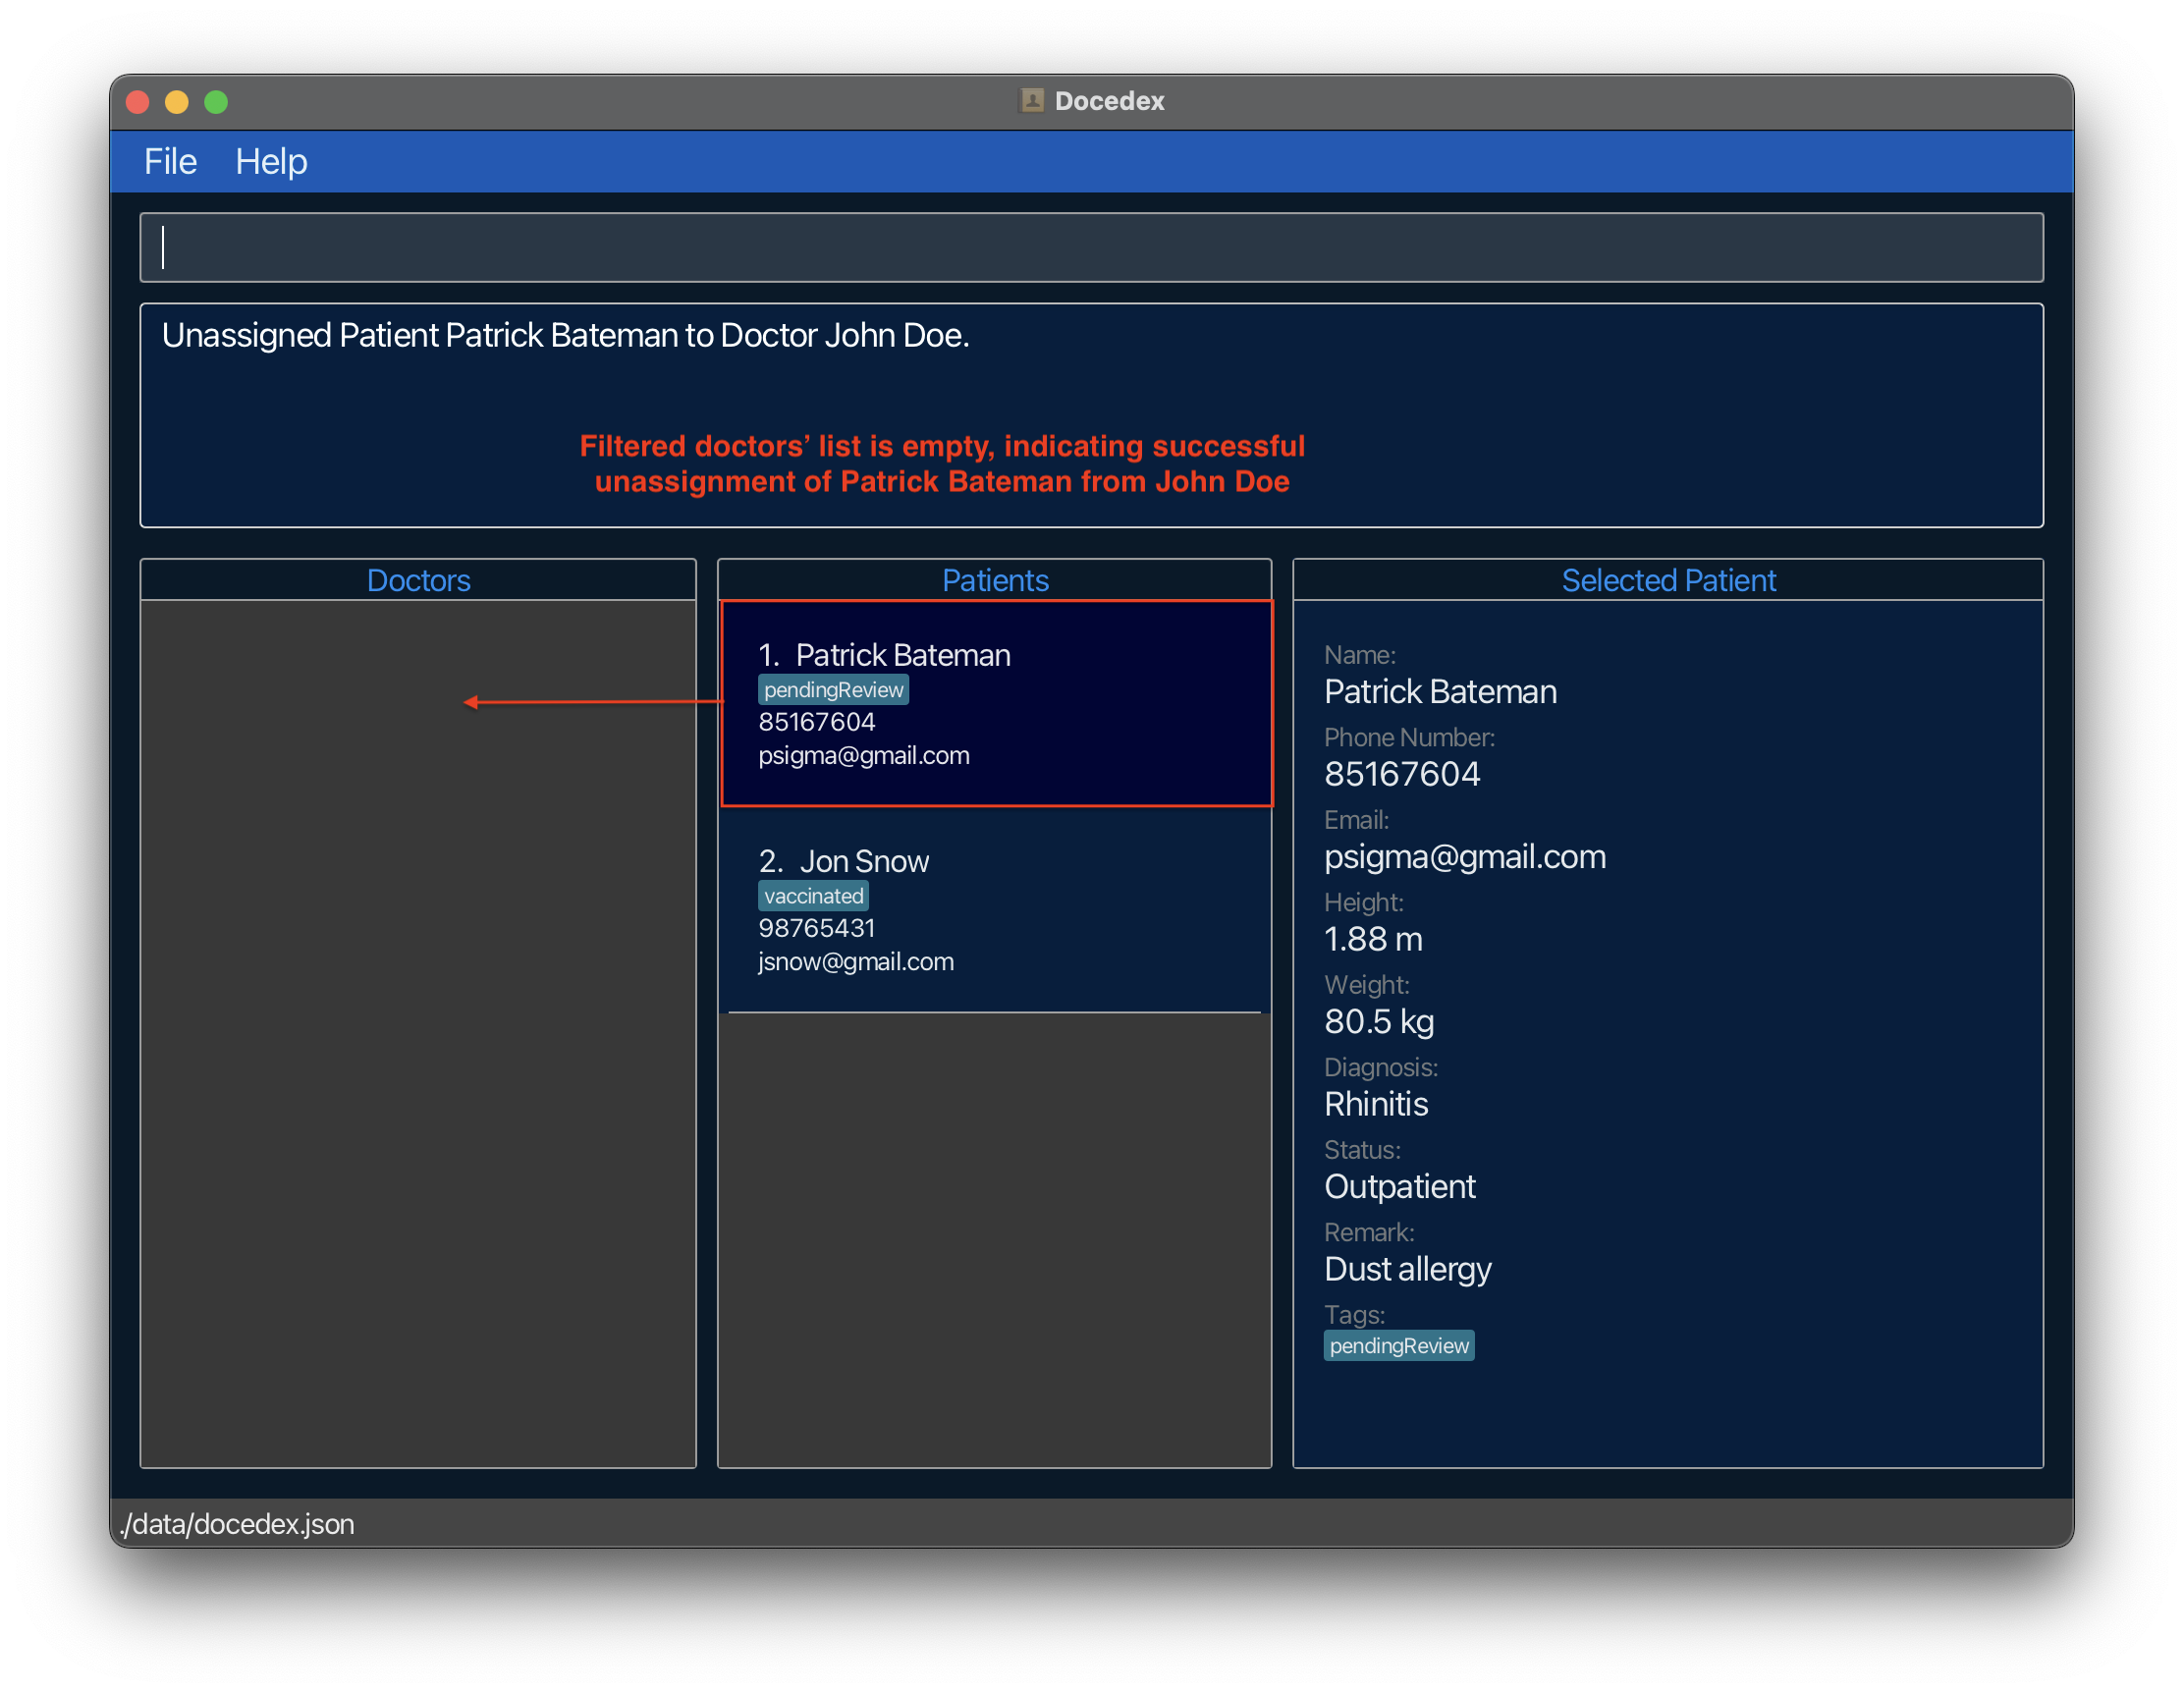
- Let us try finding a doctor named John. Enter the command
find-doc n/Johnin the command box. - Let us try finding a patient with the name Patrick. Enter
find-ptn n/Patrickin the command box. - Let us try deleting a doctor from Docedex. Enter the command
del-doc 1in the command box. This removes the first displayed doctor in the doctors’ list. - Let us try deleting a patient from Docedex. Enter the command
del-ptn 1in the command box. This removes the first displayed patient in the patients’ list. - Let us try listing all doctors. Enter the command
list-docin the command box. This lists all the doctors within Docedex. - Let us try listing all patients. Enter the command
list-ptnin the command box. This lists all the patients within Docedex. - Congratulations! You are now ready to use Docedex.
To view all our features, you may visit our features section.
Scroll back to Table of Contents
Features
Doctor Commands
Adding a doctor
add-doc n/NAME p/PHONE_NUMBER e/EMAIL s/SPECIALITY y/YEARS_OF_EXPERIENCE [t/TAGS]…
- To view parameter information click here
- What it does: Adds a new doctor to the doctors list and filters the patients’ list to display only associate patients.
-
Possible use cases: A new doctor has joined your department/you are setting Docedex up for the first time.
- Examples:
add-doc n/John Doe p/98765432 e/johnd@example.com s/Cardiology y/5 t/surgeonadd-doc n/Gabriel Tan p/98765432 e/gabt@example.com s/Neurosurgery y/5
Scroll back to Table of Contents
Editing a doctor
edit-doc INDEX [n/NAME] [p/PHONE_NUMBER] [e/EMAIL] [s/SPECIALTY] [y/YOE] [t/TAGS]…
- To view parameter information click here
- What it does: Edits the doctor at the specified
INDEXusing any specified parameters as the new value. - Possible use cases: Updating contact information of a doctor.
- Note to users:
- The index refers to the index number shown in the displayed doctor list.
- Users can edit specific doctors in the clinic by providing at least one of the optional parameters. Specified parameters will be updated to the input values and all other parameter values will remain the same.
- At least one of the optional parameters must be provided.
- When editing tags, you have to include any previous tags that was already included in the doctor, or else these tags will be removed. This also means that you can use
t/to remove all tags from a doctor using theedit-doccommand.
- Examples:
-
edit-doc 1 p/91234567Edits the phone number of the 1st doctor to be91234567. -
edit-doc 2 n/Gabriel Tan p/12345678 t/Edits the name and phone number of the 2nd doctor to beGabriel Tanand91234567respectively. Adding t/ also clears all existing tags.
-
Scroll back to Table of Contents
Deleting a doctor
del-doc INDEX
- To view parameter information click here
- What it does: Deletes the specified doctor from the address book.
- Note to user:
- The index refers to the index number shown in the displayed doctor list. If the doctor you wish to delete is not shown on the doctor’s list, you can try using
list-docto list out all the doctors first.
- The index refers to the index number shown in the displayed doctor list. If the doctor you wish to delete is not shown on the doctor’s list, you can try using
Examples:
-
list-docfollowed bydel-doc 2deletes the 2nd doctor in the address book. -
find-doc Gabrielfollowed bydel-doc 1deletes the 1st doctor in the results of thefind-doccommand.
Scroll back to Table of Contents
Finding a doctor
find-doc [n/NAME] [p/PHONE_NUMBER] [e/EMAIL] [s/SPECIALTY] [y/YEARS_OF_EXPERIENCE] [t/TAGS]…
- To view parameter information click here
- What it does: Find doctors with specified parameter value
- Possible use cases: Retrieval of doctor records
- Note to user:
- Matches are case-insensitive.
- Parameters are matched if they contain the search value (if there are two doctors named Gabriel and Gabriella in Docedex, using the command with search value
n/Gabrielretrieves both records). - At least one of the parameters must be provided.
- More than one tag can be provided.
- Blank parameters will be ignored.
- Please follow the parameter constraints closely, or you will not retrieve any doctors.
- Examples:
-
find-doc n/Gabrielmatches any doctor with the name containing the stringGabriel. -
find-doc n/Gabriel t/friend t/expertmatches any doctor with the name containing the stringGabrieland has tagsfriendandexpert. -
find-doc y/3matches any doctor that has the number 3 in their years of experience, i.e.3,30,23will be matched but5and10will not be matched. -
find-doc n/@#$!will not return any doctors because the search query for name does not follow the constraints for the name parameter.
-
Scroll back to Table of Contents
Select doctor
sd INDEX
- To view parameter information click here
- What it does: This command mimics a mouse click on a doctor’s contact card. It shows the information of the doctor and filters the patients’ list to only show assigned patients.
- Possible use cases: Find which patients were treated by a doctor
- Note to user:
- The index refers to the index number shown in the displayed doctor list.
Scroll back to Table of Contents
Listing all doctors
list-doc
- Possible use cases: Retrieval of all doctors in Docedex after commands involving selection.
- What it does: Lists all doctors in Docedex.
For more information see: Selecting doctors or patients through commands
Scroll back to Table of Contents
Patient Commands
Adding a patient
add-ptn n/NAME p/PHONE e/EMAIL h/HEIGHT w/WEIGHT d/DIAGNOSIS st/STATUS [r/REMARK] [t/TAGS]…
- To view parameter information click here
- Possible use cases: Adding a new patient visiting a clinic to the address book.
-
What it does: Adds a new patient to the patients’ list and filters the doctors’ list to show only associated doctors.
- Examples:
add-ptn n/Patrick Bateman p/85167604 e/psigma@gmail.com h/1.88 w/80.5 d/Rhinitis st/Outpatient r/Dust allergy t/brotheradd-ptn n/Patrick Bateman p/85167604 e/psigma@gmail.com h/1.88 w/80.5 d/Rhinitis st/Outpatient
Scroll back to Table of Contents
Assigning a patient to a doctor
assign-ptn ptn/PATIENT_INDEX doc/DOCTOR_INDEX
- To view parameter information click here
- What it does: Performs an assignment operation and filters the doctors’ list to show only the doctors associated with the patient.
- Possible use cases: Assigning a newly arrived patient to an available doctor.
- Examples:
-
assign-ptn ptn/1 doc/1assigns the first patient to the first doctor.
-
Scroll back to Table of Contents
Undoing assignment of a patient from a doctor
unassign-ptn ptn/PATIENT_INDEX doc/DOCTOR_INDEX
- To view parameter information click here
- What it does: Undoes the assignment of a patient from a doctor. Filters the doctors list to highlight only doctors associated with the patient.
- Possible use cases: Transferring a patient’s case from one doctor to another
- Examples:
-
unassign-ptn ptn/1 doc/1undoes the assignment of the first patient from the first doctor.
-
Scroll back to Table of Contents
Editing a patient
edit-ptn [INDEX] [n/NAME] [p/PHONE] [e/EMAIL] [h/HEIGHT] [w/WEIGHT] [d/DIAGNOSIS] [st/STATUS] [r/REMARK] [t/TAGS]…
- To view parameter information click here
- What it does: Edits the patient at the specified
INDEX.
- Note to users:
- The index refers to the index number shown in the displayed patient list.
- Users can edit specific patients in the clinic by providing at least one of the optional parameters. Specified parameters will be updated to the input values and all other parameter values will remain the same.
- At least one of the optional parameters must be provided.
- When editing tags, you have to include any previous tags that was already included in the patient, or else these tags will be removed. This also means that you can use
t/to remove all tags from a doctor using theedit-doccommand.
- Examples:
-
edit-ptn 1 n/Daenerys TargaryenEdits the name of the 1st patient to beDaenerys Targaryen. -
edit-ptn 2 n/Daenerys Targaryen st/Inpatient t/Edits the name and status of the 2nd patient to beDaenerys TargaryenandInpatientrespectively. Adding t/ also clears all existing tags.
-
For more information see: Selecting doctors or patients through commands
Scroll back to Table of Contents
Deleting a patient
- Command format:
del-ptn INDEX - What it does: Deletes the specified patient from the address book.
- Note to user:
- The index refers to the index number shown in the displayed patient list.
Examples:
-
list-ptnfollowed bydel-ptn 2deletes the 2nd patient in the address book. -
find-ptn Gabrielfollowed bydel-ptn 1deletes the 1st patient in the results of thefind-ptncommand.
Scroll back to Table of Contents
Finding a patient
find-ptn [n/NAME] [p/PHONE] [e/EMAIL] [h/HEIGHT] [w/WEIGHT] [d/DIAGNOSIS] [st/STATUS] [r/REMARK] [t/TAGS]…
- To view parameter information click here
- What it does: Find patients with specified parameter value
- Possible use cases: Retrieval of patient records
- Note to user:
- Matches are case-insensitive.
- Parameters are matched if they contain the search value (if there are two patients named Gabriel and Gabriella in Docedex, using the command with search value
n/Gabrielretrieves both records). - At least one of the parameters must be provided.
- More than one tag can be provided.
- Blank parameters will be ignored.
- Please follow the parameter constraints closely, or you will not retrieve any patients.
- Examples:
-
find-ptn n/Alicematches any patient with the name containing the stringAlice. -
find-ptn h/1match any patient with the height containing the string1, i.e.1.70and0.91will be matched but0.99and2.00will not be matched.
-
Scroll back to Table of Contents
Select patient
sp INDEX
- To view parameter information click here
- What it does: This command mimics a mouse click on a patient’s contact card. It shows the information of the patient and filters the doctors’ list to only show assigned doctors.
- Possible use cases: Find which doctors treated a patient
- Note to user:
- The index refers to the index number shown in the displayed patient list.
Scroll back to Table of Contents
Listing all patients
list-ptn
- Possible use cases: Retrieval of all patients in Docedex after commands involving selection.
- What it does: Lists all patients in Docedex.
For more information see: Selecting doctors or patients through commands
Scroll back to Table of Contents
Common Commands
Viewing help
- Command format:
help - What it does: Shows a message explaining how to access this help page.
Scroll back to Table of Contents
Exiting the program
- Command format:
exit - What it does: This command is equivalent to closing the application (exits the program).
Scroll back to Table of Contents
Clearing all data
- Command format:
clear - What it does: This command will clear all data in Docedex.
Scroll back to Table of Contents
Saving the data
Docedex data is saved automatically after any command that changes data. There is no need to save manually.
Scroll back to Table of Contents
Editing the data file
Docedex data is saved as a JSON file at this specified path: [JAR file location]/data/docedex.json.
DO NOT modify data directly, as it might result in the malfunction of the application. In the worst case scenario, all your data may be reset. Only modify data directly if you know what you are doing and accept the risks of such actions.
Scroll back to Table of Contents
FAQ
Launching Docedex
Q: How can I launch docedex if the clicking on the JAR file does not work?
A: There are two possible methods to launch Docedex.
Method 1: For users familiar with the command prompt
- Open the command prompt
- Navigate to the directory where the JAR file is located using
cd [JAR file location] - Type
java -jar docedex.jarand press enter - Docedex should launch
Method 2: For users that wish to create a script to launch Docedex (Recommended)
- Create a new text file
- Copy and paste the following into the text file:
java -jar [JAR file location]/docedex.jar - Save the text file as
docedex.bat(Windows) ordocedex.sh(MacOS/Linux) - Change the admin settings of the script to allow it to run as a program:
- Windows: Right-click on the script and select
Properties. UnderGeneral, check the box that saysAllow this file to run as a program. - MacOS/Linux: Open the terminal and navigate to the directory where the script is located. Type
chmod +x [script name]and press enter. (chmod +xchanges permissions of the script to allow it to be executed.)
- Windows: Right-click on the script and select
- Double-click on the script to launch Docedex
- Docedex should launch
If you have any further issues, please raise an issue on our GitHub page. We will attend to you as soon as we can.
Checking Java version
Q: How can I check my Java version?
A: Open a command prompt and type java -version. If you do not have Java installed, you can download it here.
For Mac Users you may wish to follow the instructions listed here
Loading Data from another computer
Q: How can I load data from another computer into Docedex installed on another computer?
A: Delete the docedex.json file (stored at [JAR file location]/data/docedex.json) from the computer that you wish to use Docedex on. Then, copy over the docedex.json file from the computer which you no longer wish to use Docedex on. After which, boot up Docedex to check whether your doctor information is properly loaded into the new computer.
Using Docedex
Q: I entered a command and my doctor/patient list was cleared. What happened?
A: Refer to the subsection titled
Selecting doctors or patients through commands
for an explanation of why this occurs.