Developer Guide
Table Of Contents
- Acknowledgements
- Setting up, getting started
- Design
- Implementation
- Documentation, Logging, Testing, Configuration, Dev-Ops
-
Appendix A: Planned Enhancements
-
Feedback to User
- Problem 1: Selection of doctor or patient cards is not cleared upon certain commands
- Problem 2: Titles of patient/doctor lists do not well describe its contents
- Problem 3: The command usage message is not consistent across the UserGuide and EditXYZCommands
- Problem 4: Better error/exception handling for invalid command inputs
- Scalability
-
Feedback to User
- Appendix B: Product scope
- Appendix C: User stories
- Appendix D: Use cases
- Appendix E: Non-Functional Requirements
- Appendix F: Glossary
- Appendix G: Effort
- Appendix H: Instructions for manual testing
Acknowledgements
This project is based on the AddressBook-Level3 project created by the SE-EDU initiative.
Scroll back to Table of Contents
Setting up, getting started
Refer to the guide Setting up and getting started.
Scroll back to Table of Contents
Design
.puml files used to create diagrams in this document can be found in the
diagrams folder.
Refer to the PlantUML Tutorial at se-edu/guides
to learn how to create and edit diagrams.
Architecture
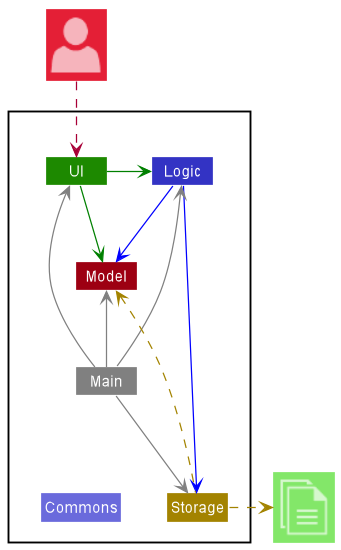
The Architecture Diagram given above explains the high-level design of the App.
Given below is a quick overview of main components and how they interact with each other.
Main components of the architecture
Main has two classes called
Main and
MainApp.
It is responsible for,
- At app launch: Initializes the components in the correct sequence, and connects them up with each other.
- At shut down: Shuts down the components and invokes cleanup methods where necessary.
Commons represents a collection of classes used by multiple other components.
The rest of the App consists of four components.
-
UI: The UI of the App. -
Logic: The command executor. -
Model: Holds the data of the App in memory. -
Storage: Reads data from, and writes data to, the hard disk.
How the architecture components interact with each other
The Sequence Diagram below shows how the components interact with each other for the scenario where the user issues
the command del-doc 1.
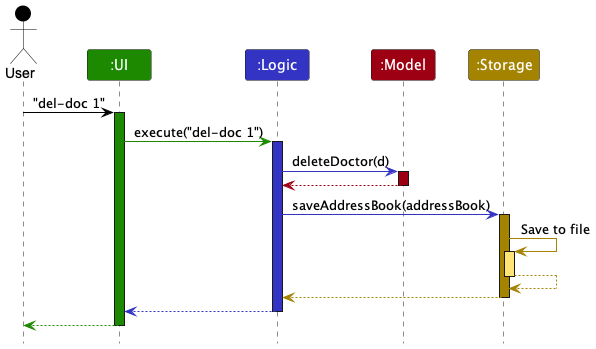
Each of the four main components (also shown in the diagram above),
- defines its API in an
interfacewith the same name as the Component. - implements its functionality using a concrete
{Component Name}Managerclass (which follows the corresponding APIinterfacementioned in the previous point.
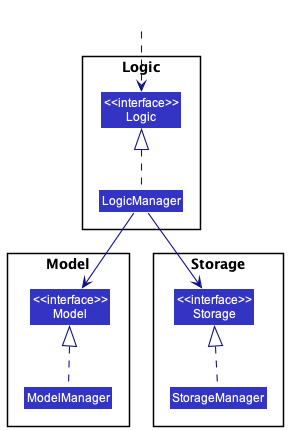
For example, the Logic component defines its API in the Logic.java interface and implements its functionality using
the LogicManager.java class which follows the Logic interface. Other components interact with a given component
through its interface rather than the concrete class (reason: to prevent outside component’s being coupled to the
implementation of a component), as illustrated in the (partial) class diagram below.
The sections below give more details of each component.
Scroll back to Table of Contents
UI component
API : Ui.java
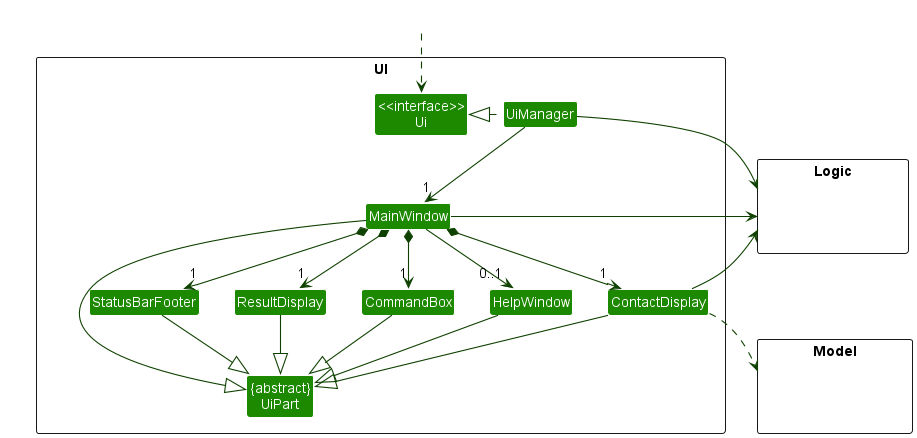
The UI consists of a MainWindow that is made up of multiple smaller components. Some notable examples are
CommandBox, ResultDisplay and ContactDisplay. All these, including the MainWindow,
inherit from the abstract UiPart class which captures the commonalities between classes that
represent parts of the visible GUI.
The UI component uses the JavaFX UI framework. The layout of these UI parts are defined in matching
.fxml files that are in the src/main/resources/view folder. For example, the layout of the
MainWindow
is specified
in MainWindow.fxml
The UI component does the following
- executes user commands using the
Logiccomponent. - listens for changes to
Modeldata so that the UI can be updated with the modified data. - keeps a reference to the
Logiccomponent, because theUIrelies on theLogicto execute commands. - depends on some classes in the
Modelcomponent, as it displaysDoctororPatientobject residing in theModel.
Scroll back to Table of Contents
Main Window
The MainWindow houses all the components that make up the visual display of Docedex. Its primary
function is to listen to user input through the CommandBox, initiate the execution of the command,
and display the result through the ResultDisplay and/or ContactDisplay.
Here is a table containing a brief description of the purpose of the smaller components within MainWindow.
| Name of component | Description |
|---|---|
CommandBox |
Allows users to enter Docedex commands. |
ResultDisplay |
Provides CLI-based feedback upon a user command. Allows users to see if their command was successful or not. Provides error messages to guide user on how to use Docedex commands. |
ContactDisplay |
Contains components that provide visual feedback upon manipulation of doctors and patients. More details about these components can be found here. |
HelpWindow |
Displays a help window containing a link to the User Guide. |
StatusBarFooter |
Shows the location of the Docedex storage. |
The implementations of CommandBox, ResultDisplay, StatusBarFooter, and HelpWindow are relatively
straightforward. Therefore, this guide will not dive deeper into how these components are implemented.
You may refer to their implementations here
Scroll back to Table of Contents
Contact Display
The ContactDisplay houses all the components that provide visual feedback after the manipulation
of doctors and patients within Docedex.
Here is a table containing a brief description of the purpose of the smaller components within ContactDisplay.
| Name of component | Description |
|---|---|
DoctorListPanel |
Shows a list of DoctorCard. This list can be manipulated through commands.Upon starting the app, this list will reflect all doctors in Docedex. Upon selection of a PatientCard, this list will filter to show doctors assigned to said patient. |
DoctorCard |
Displays key information about a doctor, such as name, phone number, email and tags. |
PatientListPanel |
Shows a list of PatientCard. This list can be manipulated through commands.Upon starting the app, this list will reflect all patients in Docedex. Upon selection of a DoctorCard, this list will filter to show patients assigned to said doctor. |
PatientCard |
Displays key information about a patient, such as name, phone number, email and tags. |
EnlargedDoctorInfoCard |
Displays all information about a selected doctor. |
EnlargedPatientInfoCard |
Displays all information about a selected patient. |
Here is a class diagram of how these components come together within the ContactDisplay.
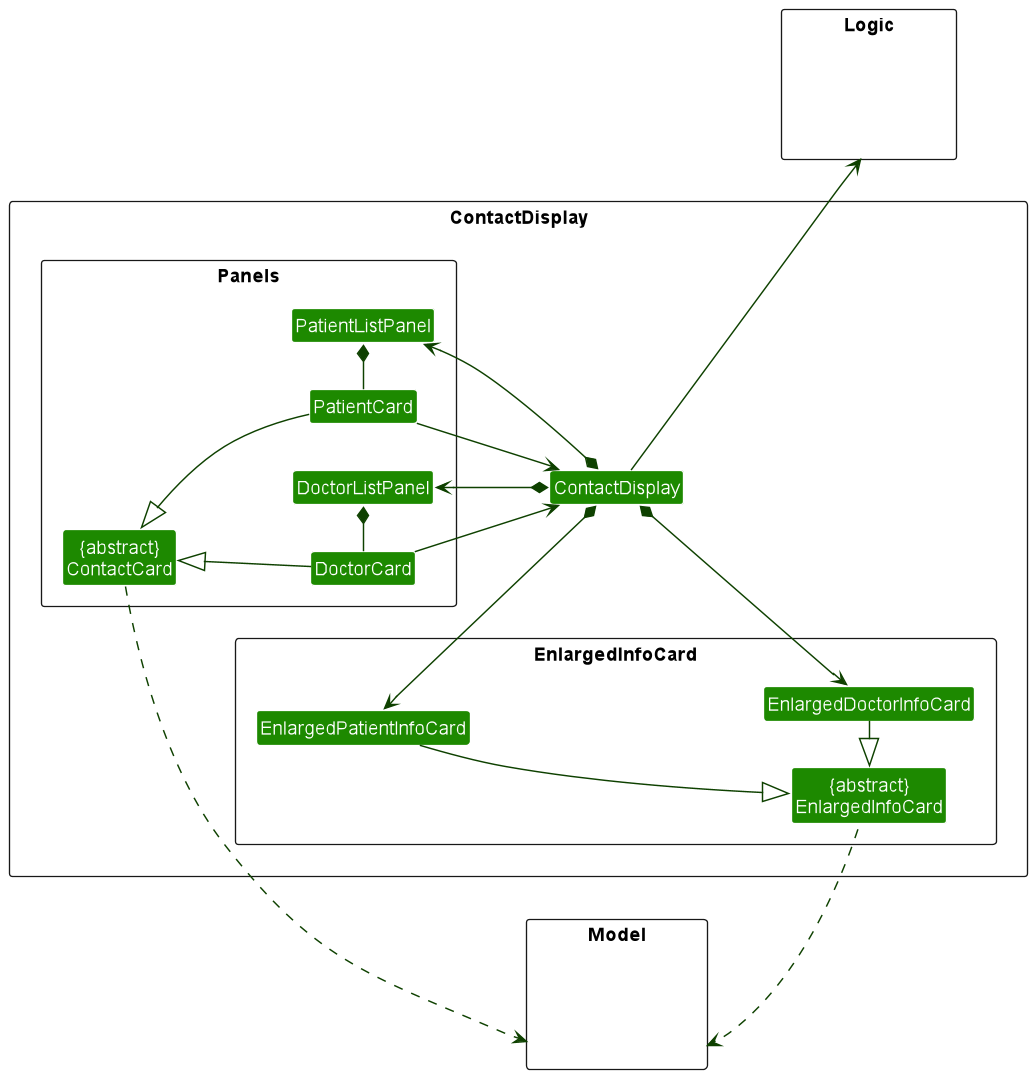
How the ContactDisplay works:
- Upon a user command through the
CommandBox, thesetFeedbackToUser(CommandResult commandResult)method takes in the result of the command entered. TheCommandResultcontains information on whether the command requires an update to the GUI. If such an update is required,ContactDisplaywill proceed to update all relevant components. - Upon a mouse click on a
DoctorCardorPatientCard, the following sequence of actions is similar to that described above. However, instead ofsetFeedbackToUser(CommandResult commandResult)being called, eithersetFeedbackUponSelectingDoctor(Doctor doctor)orsetFeedbackUponSelectingPatient(Patient patient)is called respectively.
To illustrate how these interactions work, let’s say that the user selects a doctor through the sd command.
The Sequence Diagram below illustrates the interactions within the ContactDisplay component upon such a command.
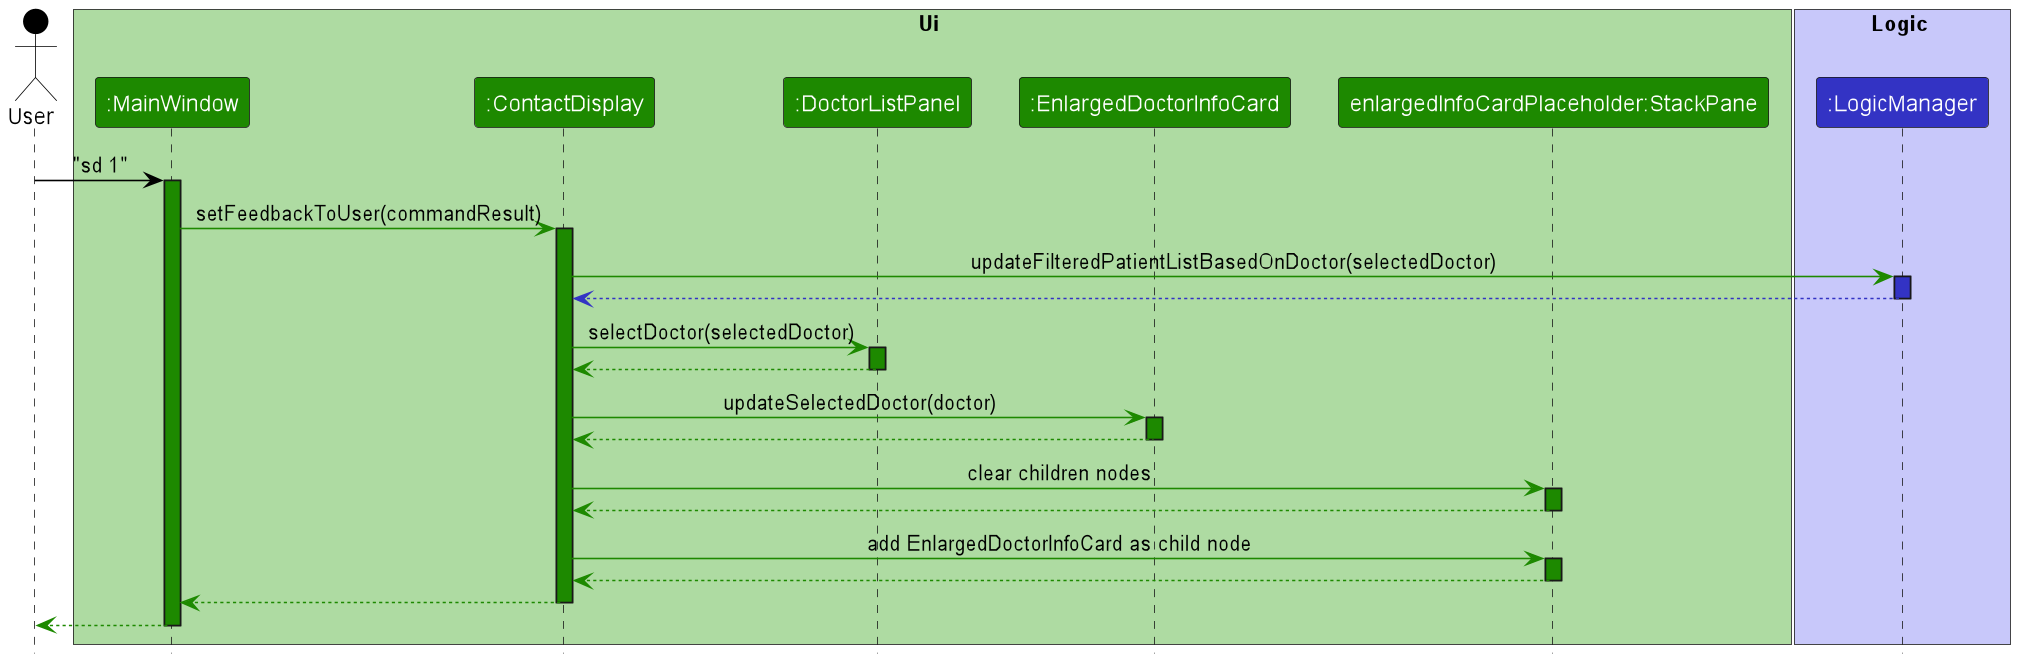
Upon a user command, we see from the diagram that the setFeedbackToUser(CommandResult commandResult) method
accomplished the following:
- Update filtered patients list in
LogicManagerto show the patients assigned to the selected doctor. - Select the requested doctor within the
DoctorListPanel. (This is a purely cosmetic selection, to provide visual feedback to the user) - Update the
EnlargedDoctorInfoCardto display the information of the selected doctor. - Place the updated
EnlargedDoctorInfoCardonto the placeholderStackPanewhich resides on the right-most column of theContactDisplay. For more information on this specific step, click here.
Scroll back to Table of Contents
Logic component
API : Logic.java
Here’s a (partial) class diagram of the Logic component:
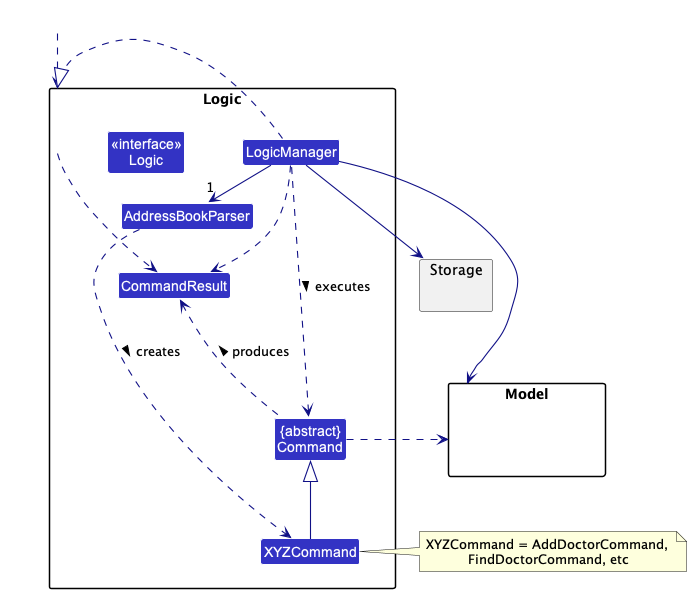
How the Logic component works:
- When
Logicis called upon to execute a command, it uses theAddressBookParserclass to parse the user command. - This results in a
Commandobject (more precisely, an object of one of its subclasses e.g.,AddDoctorCommand) which is executed by theLogicManager. - The command can communicate with the
Modelwhen it is executed (e.g. to add a doctor). - The result of the command execution is encapsulated as a
CommandResultobject which is returned back fromLogic.
The Sequence Diagram below illustrates the interactions within the Logic component for the execute("delete-doc 1")
API call.
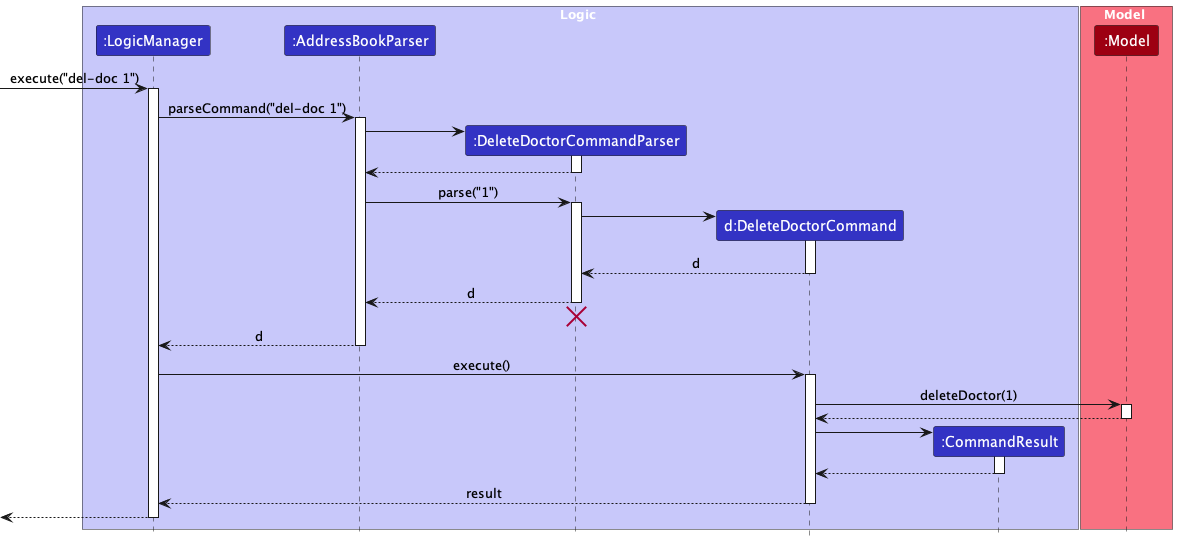
DeleteDoctorCommandParser should end at the destroy marker (X) but due to a limitation of PlantUML, the lifeline reaches the end of diagram.
Here are the other classes in Logic (omitted from the class diagram above) that are used for parsing a user command:
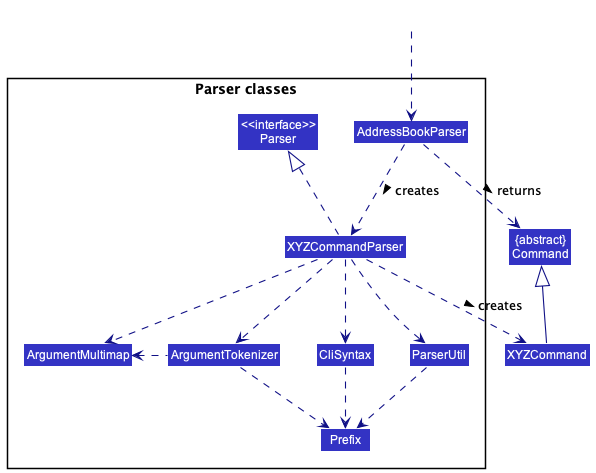
How the parsing works:
- When called upon to parse a user command, the
AddressBookParserclass creates anXYZCommandParser(XYZis a placeholder for the specific command name e.g.,AddDoctorCommandParser) which uses the other classes shown above to parse the user command and create aXYZCommandobject (e.g.,AddDoctorCommand) which theAddressBookParserreturns back as aCommandobject. - All
XYZCommandParserclasses (e.g.,AddDoctorCommandParser,DeleteDoctorCommandParser, …) inherit from theParserinterface so that they can be treated similarly where possible e.g, during testing.
Scroll back to Table of Contents
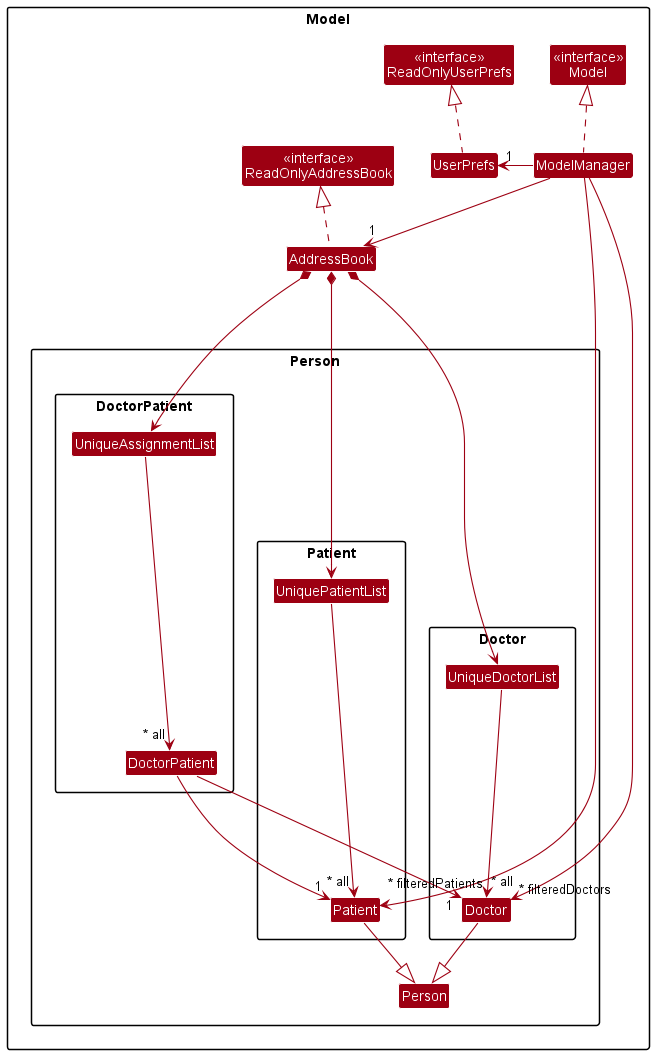
Model component
API : Model.java
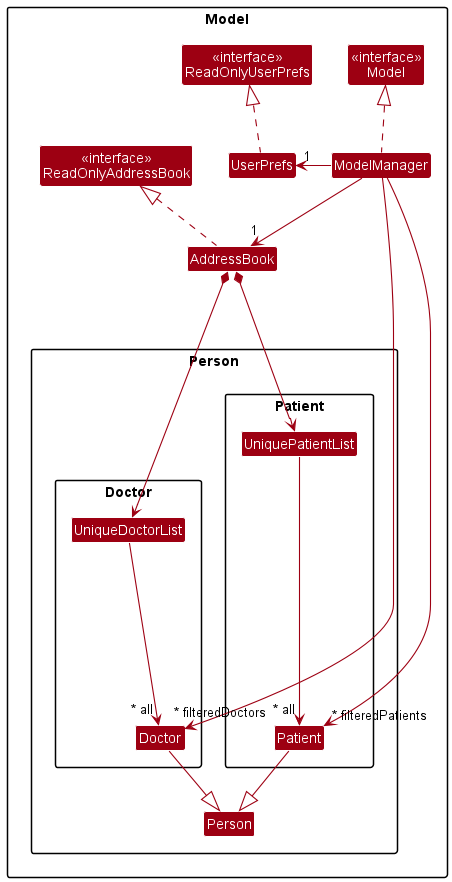
The Model component,
- stores the address book data i.e., all
DoctorandPatientobjects (which are contained in aUniqueDoctorListandUniquePatientListobject). - stores the currently ‘selected’
DoctorandPatientobjects (e.g., results of a search query) as a separate filteredDoctors and filteredPatients list which is exposed to outsiders as an unmodifiableObservableList<Doctor>andObservableList<Patient>that can be ‘observed’ e.g. the UI can be bound to this list so that the UI automatically updates when the data in the list change. - stores a
UserPrefobject that represents the user’s preferences. This is exposed to the outside as aReadOnlyUserPrefobjects. - does not depend on any of the other three components (as the
Modelrepresents data entities of the domain, they should make sense on their own without depending on other components)
Scroll back to Table of Contents
Storage component
API : Storage.java
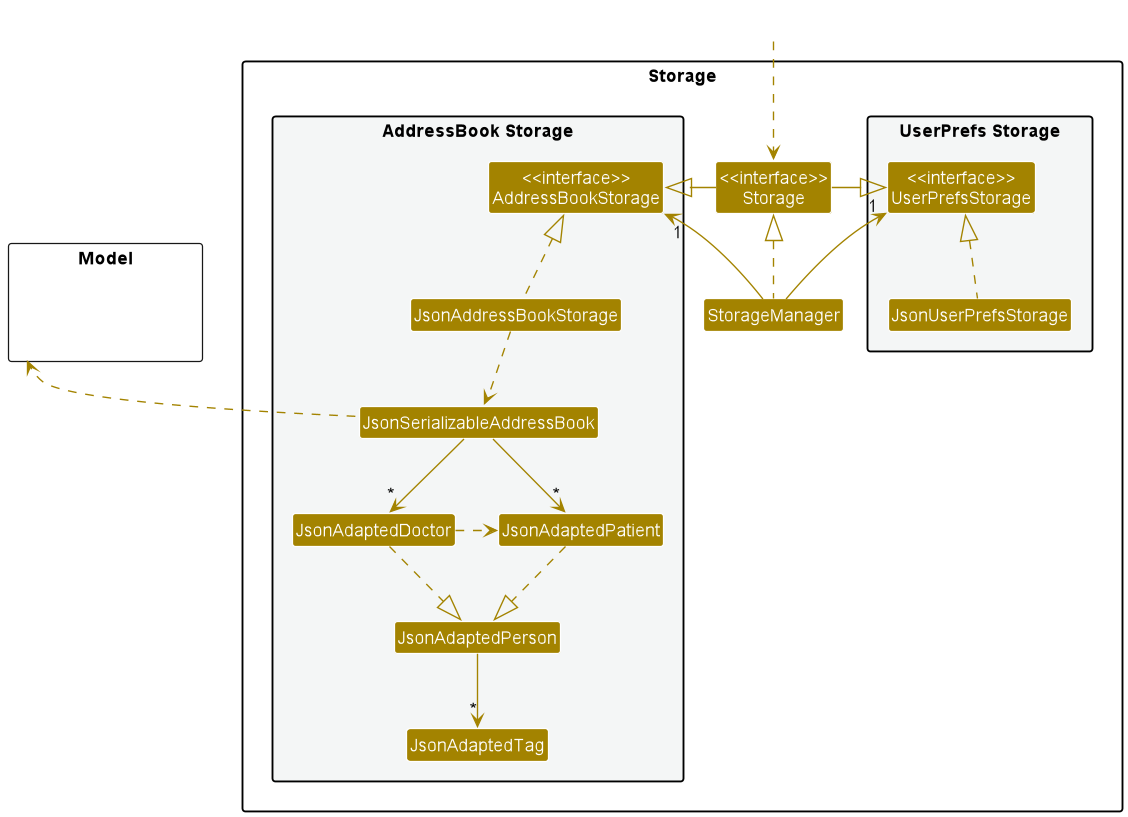
The Storage component does the following:
- Saves both address book and user preference data in JSON format after every command
- Read saved data and create the corresponding objects when starting up Docedex.
Notes about the Storage component
- Inherits from both
AddressBookStorageandUserPrefStorage, which means it can be treated as either one (if only the functionality of only one is needed). - Depends on some classes in the
Modelcomponent (because theStoragecomponent’s job is to save/load objects that belong to theModel)
Notes about storing assignments between doctors and patients
In our Model, the Doctor contains a list of Patient that they are assigned to,
and the Patient contains a list of Doctor that they are assigned to.
However, this causes issues when we try to store these objects as is, since the bidirectional navigability will result in an endless loop if we try to convert these objects into their JSON format. While the creation of an association class to store information about assignment is ideal, this will be implemented in the future due to time constraints.
Therefore, as of v1.4, Storage only stores the information of assignment within the JsonAdaptedDoctor.
In essence, it stores the doctors together with their assigned patients. So each doctor will have a JSON key
named patients that stores a dictionary of JsonAdaptedPatient that represent each assigned patient.
That leaves us with the unassigned patients within the Model. These patients are stored separately
under another JSON key named unassignedPatients.
JsonAdaptedPatient does not store any information about the doctors that were assigned to each patient.
Scroll back to Table of Contents
Common classes
Classes used by multiple components are in the seedu.addressbook.commons package.
Scroll back to Table of Contents
Implementation
Add Doctor Feature
What it does
Adds a doctor to the bottom of the list of currently existing doctors. Users are able to add any valid doctor to the list. If a record of the same doctor already exists in the list, the command will not be allowed and an error will be thrown to alert user.
Example Use: add-doc n/John Doe p/98765432 e/johnd@example.com s/Cardiology y/5 t/surgeon
Implementation
Upon entry of the add doctor command, an AddDoctorCommand class is created. The AddDoctorCommand class extends the
abstract Command class and implements the execute() method. Upon execution of this method, a Doctor object is
added to the model’s list of doctors if all the attributes provided are valid and a duplicate instance does not exist.
Given below is an example usage scenario of how the add doctor command behaves at each step.
Step 1. User launches the application
Step 2. User executes add-doc n/John Doe p/98765432 e/johnd@example.com s/Cardiology y/5 t/surgeon to save a doctor.
Step 3. The doctor is added to the model’s list of doctors if valid.
The following sequence diagram illustrates how the add doctor operation works:
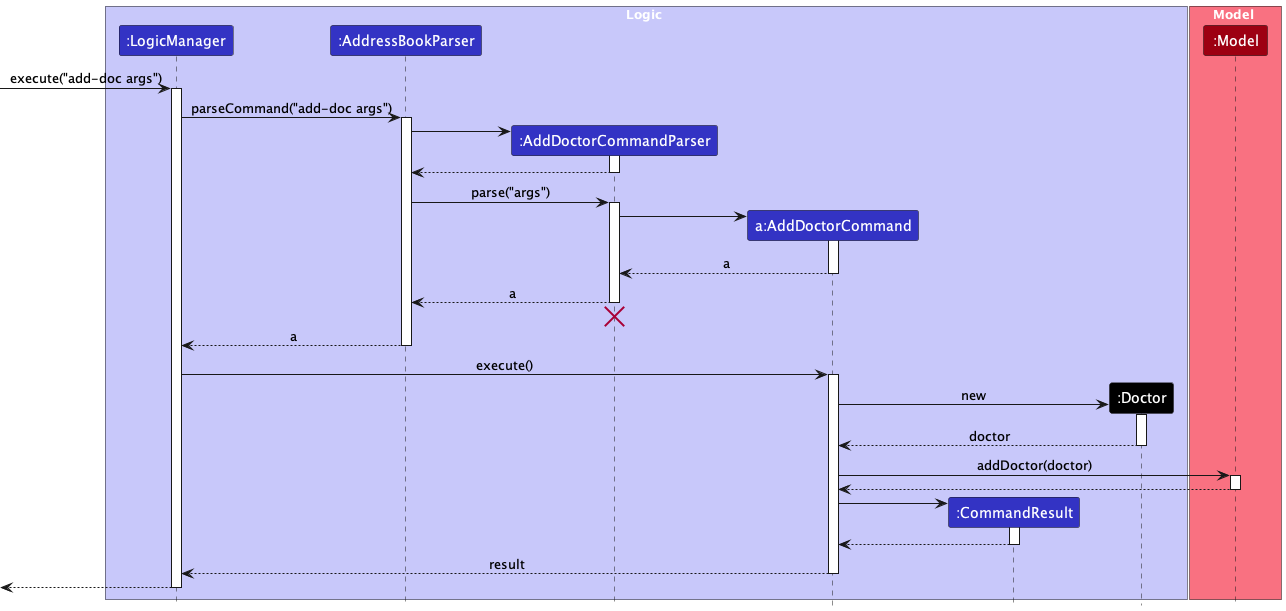 *args: Refers to a valid sequence of arguments provided by the user. Example: “n/John Doe p/98765432 e/johnd@example.com
s/Cardiology y/5 t/surgeon”
*args: Refers to a valid sequence of arguments provided by the user. Example: “n/John Doe p/98765432 e/johnd@example.com
s/Cardiology y/5 t/surgeon”
Scroll back to Table of Contents
Add Patient Feature
What it does
Adds a patient to the bottom of the list of currently existing patients. Users are able to add any valid patient to the list. If a record of the same patient already exists in the list, the command will not be allowed and an error will be thrown to alert user.
Example
Use: add-ptn n/John Doe p/98765432 e/jdoe@gmail.com h/1.85 w/70.5 d/Fever st/Outpatient r/Patient was given paracetamol for fever t/friends
Implementation
Upon entry of the add patient command, an AddPatientCommand class is created. The AddPatientCommand class extends
the abstract Command class and implements the execute() method. Upon execution of this method, a Patient object is
added to the model’s list of patients if all the attributes provided are valid and a duplicate instance does not exist.
Given below is an example usage scenario of how the add doctor command behaves at each step.
Step 1. User launches the application
Step 2. User
executes add-ptn n/John Doe p/98765432 e/jdoe@gmail.com h/1.85 w/70.5 d/Fever st/Outpatient r/Patient was given paracetamol for fever t/friends
to save a patient.
Step 3. The patient is added to the model’s list of patients if valid.
The following sequence diagram illustrates how the add doctor operation works:
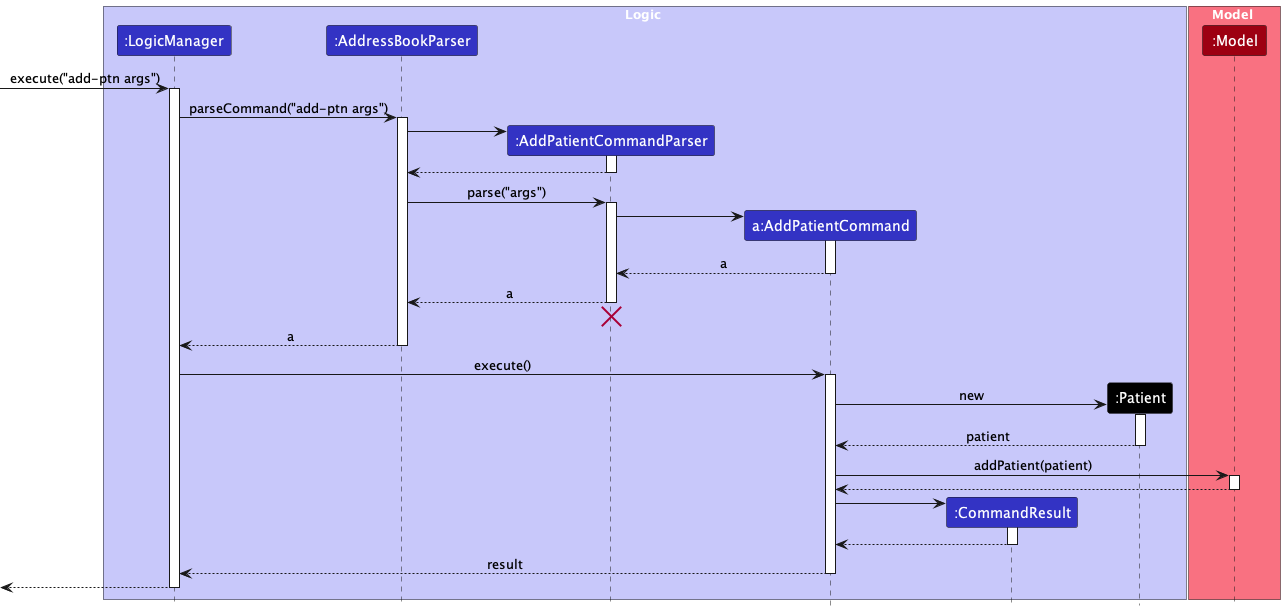 *args: Refers to a sequence of valid arguments provided by the user. Example: “n/John Doe p/98765432 e/jdoe@gmail.com
h/1.85 w/70.5 d/Fever st/Outpatient r/Patient was given paracetamol for fever t/friends”
*args: Refers to a sequence of valid arguments provided by the user. Example: “n/John Doe p/98765432 e/jdoe@gmail.com
h/1.85 w/70.5 d/Fever st/Outpatient r/Patient was given paracetamol for fever t/friends”
Scroll back to Table of Contents
Edit Doctor Feature
What it does
Users can edit specific doctors in the clinic by providing at least one of the optional fields. Existing values will be updated to the input values and all other values will remain the same. The doctor to be edited can be specified through the doctor’s index.
Example Use: edit-doc 2 n/Gabriel Tan p/12345678 s/Cardiology
Implementation
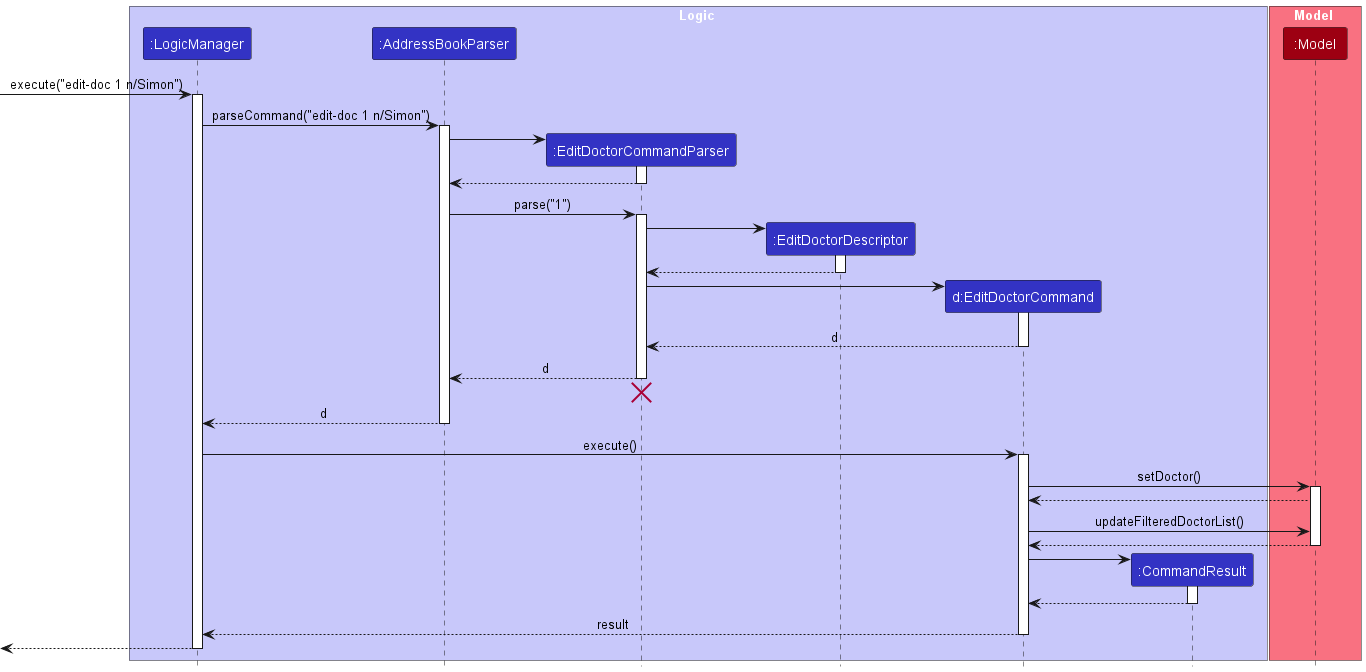
Upon entry of the edit doctor command, an EditDoctorCommand class is created. The EditDoctorCommand class extends
the abstract Command class and implements the execute() method. The EditDoctorDescriptor is created with the
arguments given
by the user. A new Doctor object is created with the new arguments, with the attributes of the old Doctor object
copied over
if the argument for that specific attribute is not provided by the user. EditDoctorDescriptor is then passed
to EditDoctorCommandParser.
The EditDoctorCommand is created using the EditDoctorDescriptor. Upon execution of EditDoctorCommand, a Doctor
object is added to the model’s list of doctors if all the attributes provided are valid and a duplicate instance does
not exist.
The following activity diagram illustrates the user flow for editing a doctor:

Given below is an example usage scenario of how the add doctor command behaves at each step.
Step 1. User launches the application
Step 2. User executes edit-doc n/Simon to edit a doctor.
Step 3. The doctor is edited and saved to the model’s list of doctors if valid.
Step 4. filteredDoctorList is updated so that the UI can display the edited doctor.
The following sequence diagram illustrates how the edit doctor operation works:
Scroll back to Table of Contents
Delete Doctor Feature
What it does
Deletes a doctor at the specified one-based index of list of currently existing/found doctors. Users are able to delete any doctor in the list. If an index larger than or equal to the size of the doctor’s list is provided, the command will not be allowed and an error will be thrown to alert user.
Example Use: del-doc 1
Implementation
Upon entry of the delete doctor command, a DeleteDoctorCommand class is created. The DeleteDoctorCommand class
extends the abstract Command class and implements the execute() method. Upon execution of this method, the doctor at
specified one-based index is removed if the index provided is valid.
Given below is an example usage scenario of how the delete doctor command behaves at each step.
Step 1. User launches the application
Step 2. User executes del-doc 1 to delete the doctor at index 1 (one-based indexing).
Step 3. The doctor at this index is removed if the index provided is valid.
The following sequence diagram illustrates how the delete doctor operation works:
Scroll back to Table of Contents
Delete Patient Feature
What it does
Deletes a patient at the specified one-based index of list of currently existing/found patient. Users are able to delete any patient in the list. If an index larger than or equal to the size of the patient’s list is provided, the command will not be allowed and an error will be thrown to alert user.
Example Use: del-ptn 1
Implementation
Upon entry of the delete doctor command, a DeletePatientCommand class is created. The DeletePatientCommand class
extends the abstract Command class and implements the execute() method. Upon execution of this method, the patient
at specified one-based index is removed if the index provided is valid.
Given below is an example usage scenario of how the delete patient command behaves at each step.
Step 1. User launches the application
Step 2. User executes del-ptn 1 to delete the patient at index 1 (one-based indexing).
Step 3. The patient at this index is removed if the index provided is valid.
The following sequence diagram illustrates how the delete patient operation works:

Scroll back to Table of Contents
Assign Patient Feature
What it does
Assigns a patient at the specified one-based index of list of currently existing/found patient to a doctor at the specified one-based index of list of currently existing/found doctor. If indexes provided are larger or equal to the size of their respective lists, the command will not be allowed and an error will be thrown. If specified patient is already assigned to specified doctor, the command will not be allowed and an error will be thrown.
Example Use: assign-ptn ptn/1 doc/1
Implementation
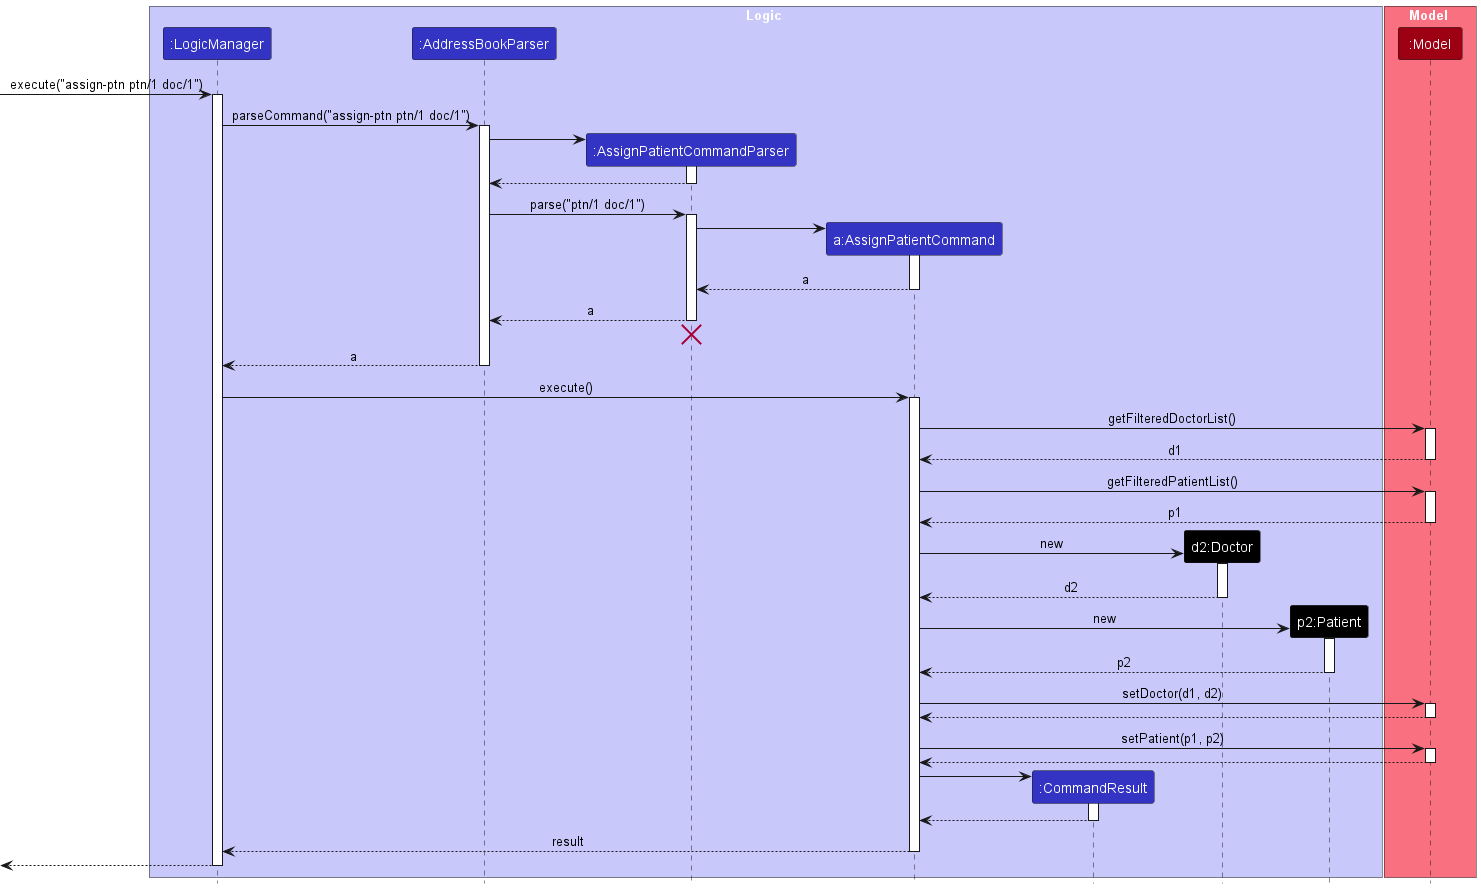
Upon entry of the assign patient command, a AssignPatientCommand class is created. The AssignPatientCommand class extends the abstract Command class and implements the execute() method. Upon execution of this method, the patient at specified one-based index is assigned to the doctor at specified one-based index if both indexes provided are valid and the patient is not assigned to the doctor yet. The AssignPatientCommand class creates a new Patient object with the specific Doctor reference and a new Doctor object with the specific Patient reference. The previous Patient and Doctor objects are then replaced with the new Patient and Doctor objects.
Given below is an example usage scenario of how the assign patient command behaves at each step.
Step 1. User launches the application
Step 2. User executes assign-ptn ptn/1 doc/1 to assign the patient at index 1 to the doctor at index 1 (one-based indexing).
Step 3. If the indexes provided are valid and patient is not assigned to doctor yet, the patient at index 1 is replaced with a patient with doctor reference and the doctor at index 1 is replaced with a doctor with patient reference.
The following sequence diagram illustrates how the assign patient operation works:
Scroll back to Table of Contents
Unassign Patient Feature
What it does
Unassigns a patient at the specified one-based index of list of currently existing/found patient from a doctor at the specified one-based index of list of currently existing/found doctor. If indexes provided are larger or equal to the size of their respective lists, the command will not be allowed and an error will be thrown. If specified patient is not assigned to specified doctor, the command will not be allowed and an error will be thrown.
Example Use: unassign-ptn ptn/1 doc/1
Implementation
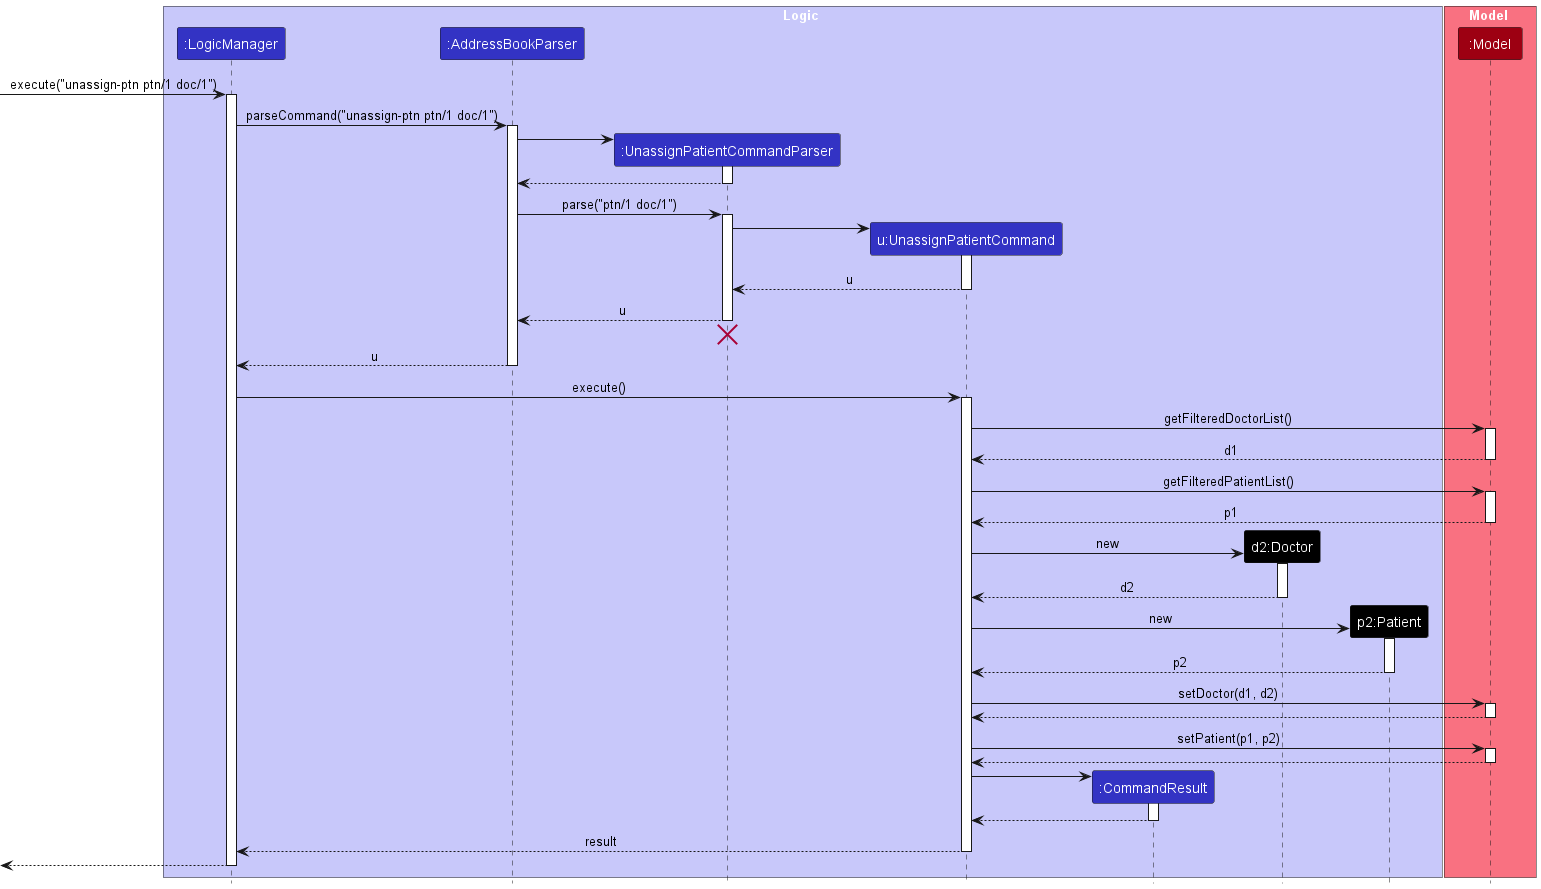
Upon entry of the unassign patient command, a UnassignPatientCommand class is created. The UnassignPatientCommand class extends the abstract Command class and implements the execute() method. Upon execution of this method, the patient at specified one-based index is unassigned from the doctor at specified one-based index if both indexes provided are valid and the patient is assigned to the doctor. The AssignPatientCommand class creates a new Patient object without the specific Doctor reference and a new Doctor object without the specific Patient reference. The previous Patient and Doctor objects are then replaced with the new Patient and Doctor objects.
Given below is an example usage scenario of how the unassign patient command behaves at each step.
Step 1. User launches the application
Step 2. User executes unassign-ptn ptn/1 doc/1 to unassign the patient at index 1 from the doctor at index 1 (one-based indexing).
Step 3. If the indexes provided are valid and patient is assigned to doctor, the patient at index 1 is replaced with a patient without doctor reference and the doctor at index 1 is replaced with a doctor without patient reference.
The following sequence diagram illustrates how the unassign patient operation works:
Scroll back to Table of Contents
Find Doctor Feature
What it does
Finds a doctor with the specified parameters.
Example Use: find-doc n/Alice
Implementation
Upon entry of the find doctor command, a FindDoctorCommand class is created. The FindDoctorCommand class takes a predicate created by DoctorContainsKeywordsPredicate class. The FindDoctorCommand class extends the abstract Command class and implements the execute() method which updates the model’s list of filtered doctors.
Given below is an example usage scenario of how the find doctor command behaves at each step.
Step 1. User launches the application
Step 2. User executes find-doc n/Alice to find a doctor with the name Alice.
Step 3. The model’s list of filtered doctors is updated.
The following sequence diagram illustrates how the find doctor operation works:
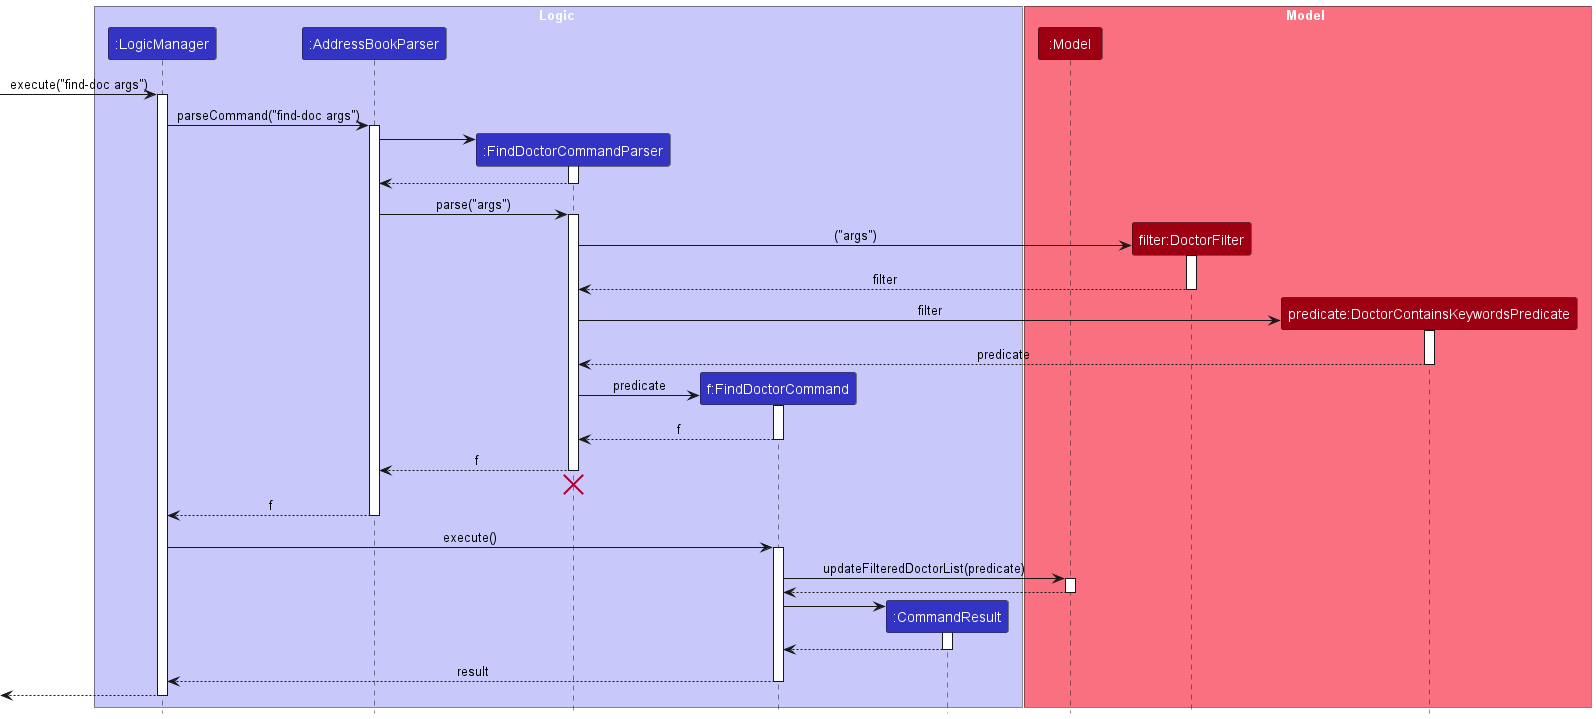
*args: Refers to a valid sequence of arguments provided by the user. Example: “n/John Doe p/98765432 e/johnd@example.com s/Cardiology y/5 t/surgeon”
Scroll back to Table of Contents
Find Patient Feature
What it does
Finds a patient with the specified parameters.
Example Use: find-ptn n/Bob
Implementation
Upon entry of the find patient command, a FindPatientCommand class is created. The FindPatientCommand class takes a predicate created by PatientContainsKeywordsPredicate class. The FindPatientCommand class extends the abstract Command class and implements the execute() method which updates the model’s list of filtered patients.
Given below is an example usage scenario of how the find patient command behaves at each step.
Step 1. User launches the application
Step 2. User executes find-ptn n/Bob to find a patient with the name Bob.
Step 3. The model’s list of filtered patients is updated.
The following sequence diagram illustrates how the find patient operation works:

*args: Refers to a sequence of valid arguments provided by the user. Example: “n/John Doe p/98765432 e/jdoe@gmail.com h/1.85 w/70.5 d/Fever st/Outpatient r/Patient was given paracetamol for fever t/friends”
Scroll back to Table of Contents
GUI Features
Enlarged Info Card feature
As triage staff manage the contacts of doctors and patients, they may wish to pull up the information related to the doctor or patient. Therefore, the right-most column within Docedex has been reserved to show the personal information of the selected doctor or patient.
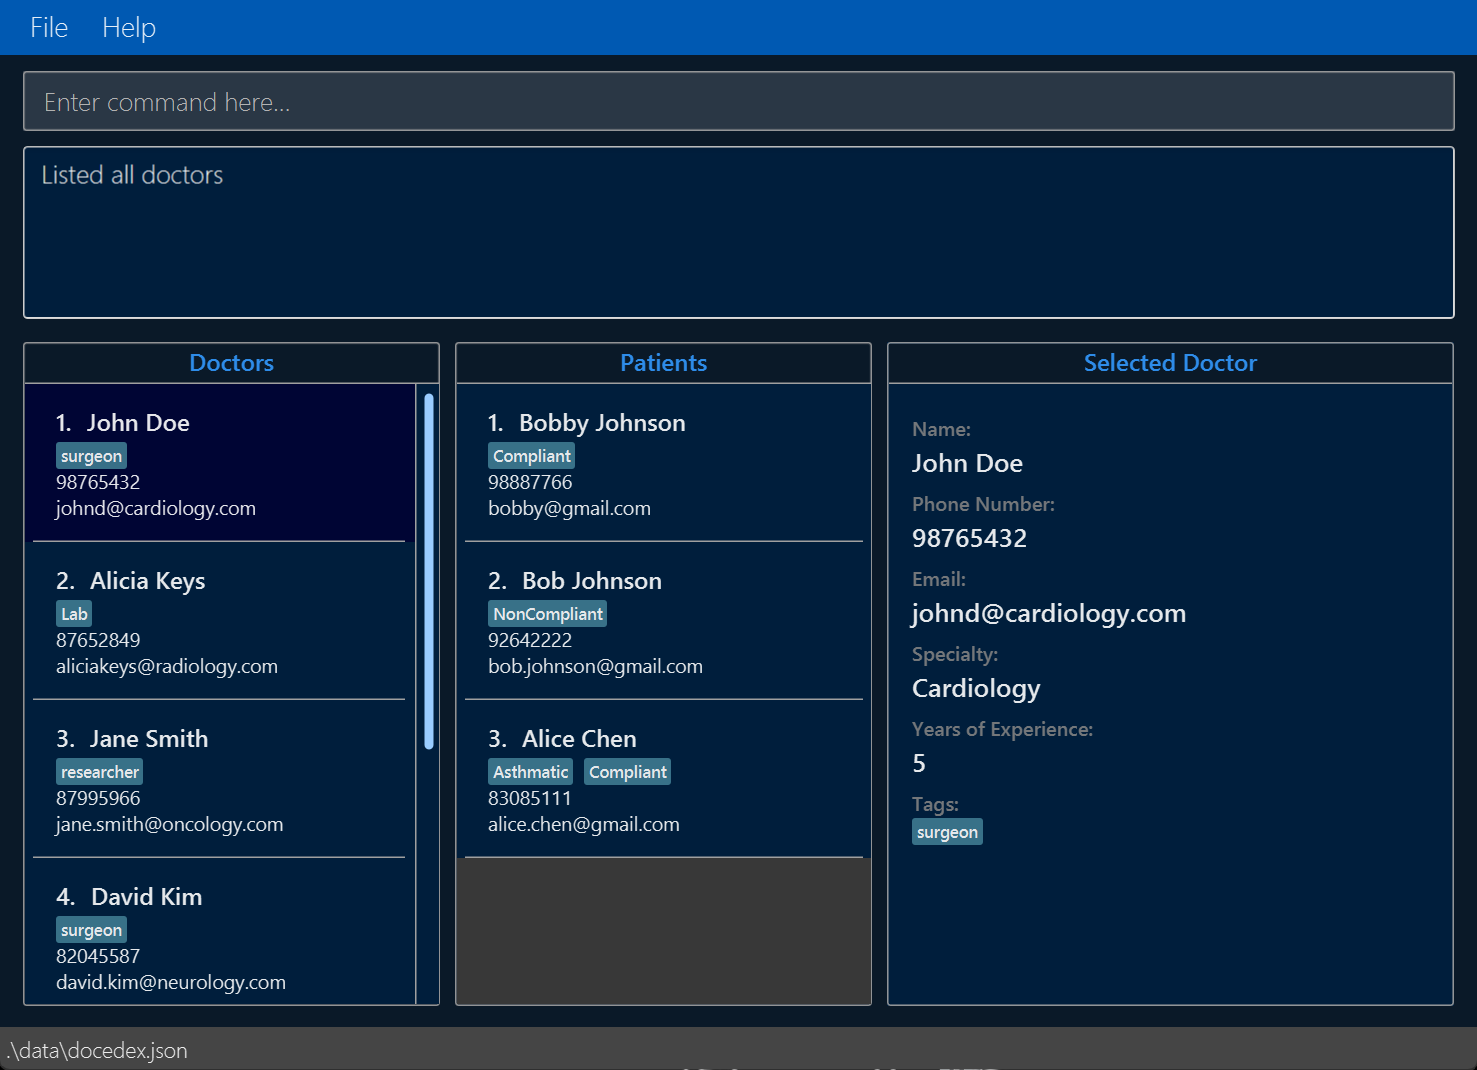
Brief introduction to the components involved
Let’s call the card which displays this information info cards. However, the information displayed for a doctor compared to a patient has a few differences. Thus, two different info cards are required - one to display patient information and one to display doctor information.
Let’s call these cards EnlargedDoctorInfoCard and EnlargedPatientInfoCard. However, we
only have one StackPane to display the information of the queried doctor or patient. This
StackPane spans over the right-most column seen in the GUI above, and serves as a placeholder
for the info cards. So, we now need a way to toggle between displaying either card, depending
on whether the user has selected a doctor or patient to view.
Scroll back to Table of Contents
Exploring the user journey
To explore how this is implemented, we will focus on the user clicking on a DoctorListViewCell
representing a doctor, though the ideas below can be extended to the user clicking on a
PatientListViewCell, as well as other ways of querying for a doctor or patient
(ie. through sd or sp command).
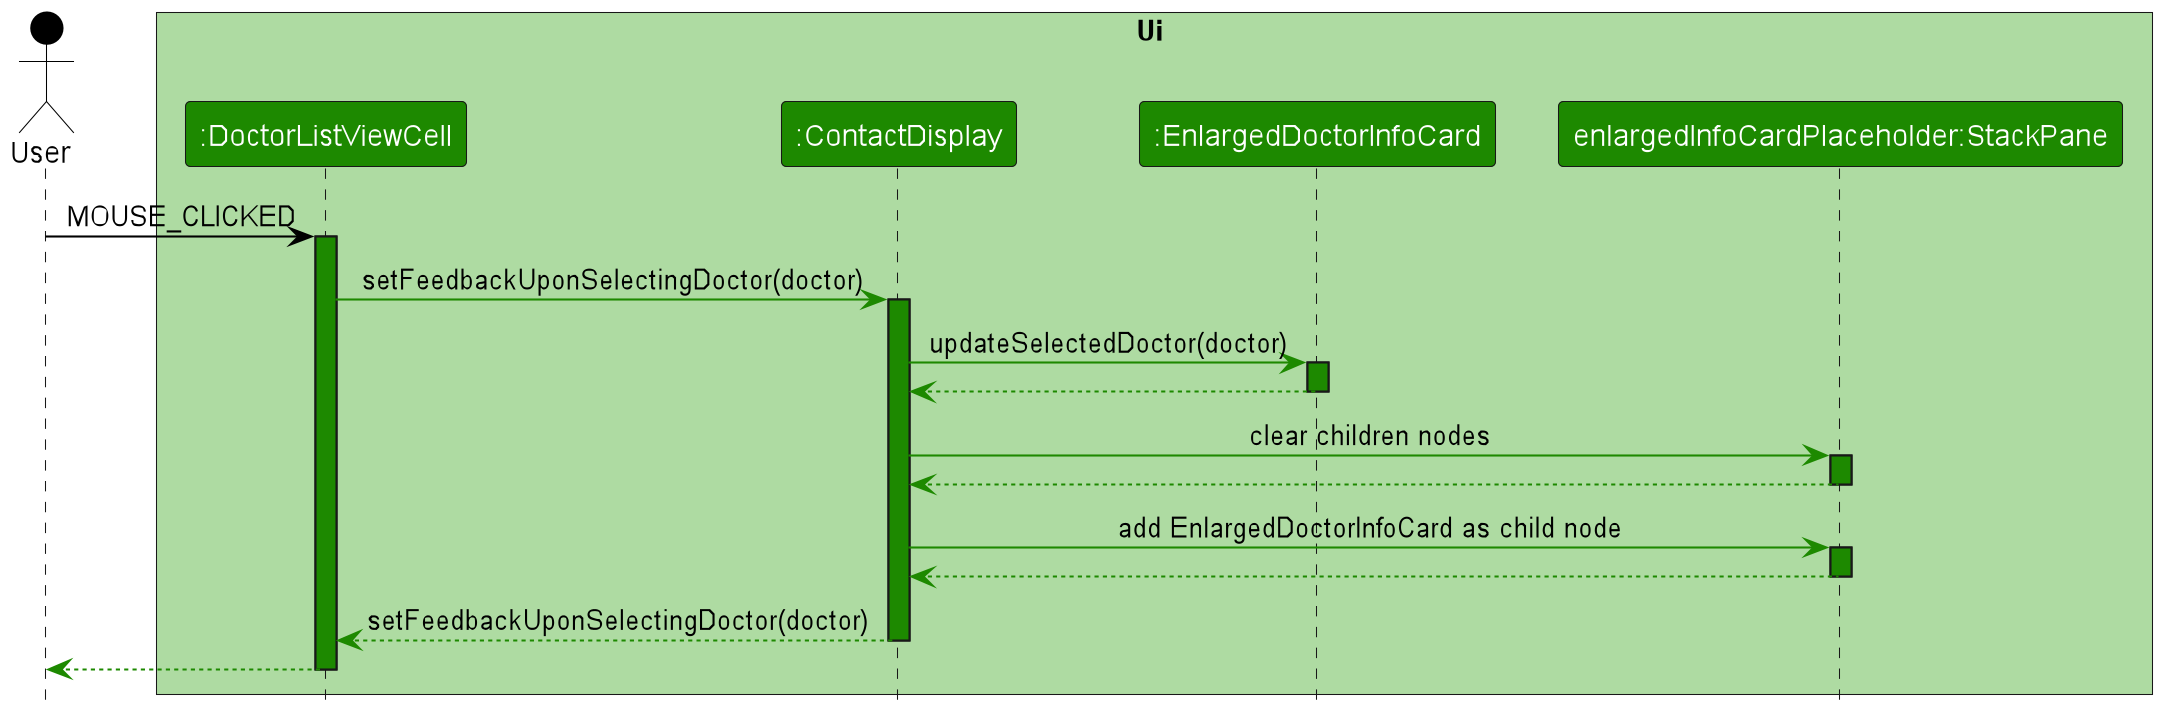
Below, we see the sequence diagram of how a mouse click from the user on the DoctorListViewCell
causes the display of information related to the doctor card through the EnlargedDoctorInfoCard.
Scroll back to Table of Contents
More details on implementation
Before diving into the details, here are a few key points to note:
- The
ContactDisplaycontains all three columns shown in the middle of the GUI. These columns represent the doctors list, patients list and an info card respectively, from left to right. - There is always only one instance of the
EnlargedDoctorInfoCard,EnlargedPatientInfoCard,ContactDisplayand placeholderStackPane.
Scroll back to Table of Contents
When the user clicks on a DoctorListViewCell, the setFeedbackUponSelectingDoctor()
call initiates the process of updating the relevant UI components to display
information about the doctor. As part of this function, the ContactDisplay updates the
doctor displayed in the EnlargedDoctorInfoCard. Lastly, the ContactDisplay clears the
current display within the placeholder StackPane, and adds the EnlargedDoctorInfoCard
as the child node of the StackPane.
At the end of this journey, the EnlargedDoctorInfoCard containing the information
of the selected doctor is displayed on the right-most column on the Docedex GUI.
A similar process happens when the user clicks on a PatientListViewCell, with
the EnlargedPatientInfoCard being populated with the appropriate data and displayed instead.
Scroll back to Table of Contents
Alternatives considered
In the past, we had a different implementation of this feature, where the DoctorListViewCell
called a function in a controller named EnlargedInfoCardController instead of the ContactDisplay.
The controller would be in charge of keeping the state of whether to display the doctor or patient.
All UI components would then refer to this controller to update themselves.
However, upon implementation, it was realised that the ContactDisplay contained all the UI components
that needs to be updated when a user selects a doctor or patient. Therefore, it was simpler and more
purposeful to let the ContactDisplay handle this update. Hence, the controller was removed and the
current design was favoured.
Scroll back to Table of Contents
Documentation, Logging, Testing, Configuration, Dev-Ops
Here are some useful links on the following!
Scroll back to Table of Contents
Appendix A: Planned Enhancements
Feedback to User
Problem 1: Selection of doctor or patient cards is not cleared upon certain commands
-
Scenario: User selected a patient on Docedex, before entering
list-doc. -
What you see: All the doctors in Docedex are listed on the GUI, as requested by the
list-doccommand. However, the user interface does not clear the selection of the previously selected patient card. - Potential issue: Confusion may arise on whether the listed doctors are assigned to the previously selected patient.
-
Why did it happen:
list-docdid not clear the previous selection of patient cards.
Note: This issue exists for the all commands that do not involve selection of doctor
or patient cards (ie. list-doc,
find-doc, del-doc,
list-ptn, find-ptn
or del-ptn).
Solution: Any commands that do not involve selection of doctor or patient cards will clear selection of all patient and doctor cards.
Scroll back to Table of Contents
Problem 2: Titles of patient/doctor lists do not well describe its contents
-
Scenario: User adds a doctor using the
add-doccommand. - What you see: Docedex automatically selects the newly added doctor. Selection of a doctor will result in an update to the patients list, as described here. Since the newly added doctor has no assigned patients, the patients list is cleared.
- Potential issue: Confusion may arise as no visual feedback is provided that the patients list is reflecting the newly added doctor’s assigned patients. Previously, some users have confused this behaviour with all patients being deleted from Docedex.
- Why did it happen: Titles of patient/doctor lists is not updated to describe the contents of the list upon user input.
Note to users and developers: This problem exists if you add a patient using add-ptn too.
Solution: The title of the patients list will be updated to display “XXX’s Patients” when any doctor is selected, where XXX is the name of the doctor. The same fix will be done for the displayed doctors list upon selection of patients.
Scroll back to Table of Contents
Problem 3: The command usage message is not consistent across the UserGuide and EditXYZCommands
-
Scenario: User enters an invalid variation of the
edit-docoredit-ptncommands - What you see: Error message that does not indicate that the entry of only one update parameter is compulsory while all others are optional.
- Potential issue: User assumes that all fields are compulsory
- Why did it happen: Implementation of feature freeze prior to resolution
Solution: Update the MESSAGE_USAGE field
in EditDoctorCommand, EditPatientCommand
and associated
tests (EditDoctorCommandTest, EditPatientCommandTest)
with parameter information and notation present in the UserGuide and the
line "At least one parameter other than INDEX should be provided\n".
Scroll back to Table of Contents
Problem 4: Better error/exception handling for invalid command inputs
- Scenario: User enters an invalid variation of a command
- What you see: Error message that does not indicate which parameter/section of the command is invalid.
- Potential issue: User has to guess which parameter/section of the command is invalid.
- Why did it happen: Implementation of feature freeze prior to resolution
Solution: Allow Command classes and associated parser utils to throw error messages of parameter/section of command that is invalid.
Scroll back to Table of Contents
Scalability
Enhancement 1: Use of association classes instead of lists to capture doctor-patient relationship on assignment
- Current: Doctor and patient assignments are currently being stored using a list inside each instance of a Doctor and Patient class. For example, if patient1 is assigned to doctor1, patient1 will have doctor1 in its list of doctors and vice versa.
- Proposed: A DoctorPatient class which models assignments between doctors and patients.
-
Justification: Although the current solution is sufficient to capture the relationships between a doctor and a person at this version of Docedex, in future iterations of Docedex, we may want to store more information about the details of the assignment between a doctor and a patient, such as the date. We may even want to want the patient’s case details to be specific based on the assignment. An association class can help make creating these new features more scalable and easier to implement.
Scroll back to Table of Contents
Enhancement 2: Validation for find command
- Current: Users are allowed to type any search query using the find command.
- Proposed: Limit search queries according to the parameter constraints.
- Justification: The current find command gives an empty list when search queries which do not fit the original parameter constraints are given. This is the expected behavior. An enhancement to the find query would be to give users a more specific error message as to why the find command gives an empty list.
Scroll back to Table of Contents
Appendix B: Product scope
Target user profile:
We hope to target admin staff within a clinic who have to settle triaging of patients.
Here are some characteristics of our target user profile:
- needs to manipulate patient and doctor information quickly
- needs to assign patients to the appropriate doctors quickly
- prefer desktop apps over other mediums
- can type fast
- prefers typing to mouse interactions
- is reasonably comfortable using CLI apps
Value proposition: Perform quick lookup and assignment of appropriate doctors to each patient in triage, faster than a typical mouse/GUI driven app.
Scroll back to Table of Contents
Appendix C: User stories
In the table below, user refers to the triage admin staff.
Priorities: High (must have) - * * *, Medium (nice to have) - * *, Low (unlikely to have) - *
| Priority | As a … | I want to … | So that I can… |
|---|---|---|---|
* * * |
user | add doctor/patient contacts into my address book | store their contacts in case I need them in the future |
* * * |
user | look up doctors by their name, specialty and/or years of experience | assign patients to relevant doctors |
* * * |
user | look up patients by their name, | view which doctors treated found patients or verify their diagnosis |
* * * |
user | edit the doctor/patient contacts in Docedex | keep the doctor/patient contacts up to date |
* * * |
user | delete doctors/patients that have left the hospital, died or have retired | ensure all doctor/patient contacts are relevant |
* * * |
user | save my doctor/patient contacts in my desktop | refer to doctor/patient contacts in the future |
* * * |
user | load my contacts from a file when I boot up the application | refer to doctor/patient contacts created in the past |
* * * |
user | tag patients with a status | determine assignment priorities to doctors |
* * * |
user | detect duplicate entries | either halt operation or update information. |
* * |
user | access the help menu | know how to use the commands within Docedex |
* * |
user | tag patients to the doctor | keep track of patients treated by the doctor |
* * |
user | tag doctors to the patients | keep track of doctors treating the patient |
* * |
user | exit the application through the CLI | terminate use of the application |
* |
user | see the history of doctors I viewed recently | re-access recently queried doctor contacts quickly |
* |
user | self-destruct my address book | protect clinic’s information in the event of a cyber-attack (last-ditch effort). |
* |
user | select doctors/patients through the CLI | minimize the use of a mouse/pointing device |
Scroll back to Table of Contents
Appendix D: Use cases
For all use cases below, we assume the following unless specified otherwise
- The System is
Docedex - The Actor is the
user - The following preconditions
- The
userhas launched theDocedexapplication.
- The
Furthermore, a lot of use cases are similar when manipulating doctors and patients. Therefore, to keep the developer guide concise, the use cases elaborated upon below are only detailed for doctors. Nonetheless, they can be extrapolated for patients too, without changes to the major details within the use case. Such associated pairs of use cases are listed in the table below.
| Doctor Use Case | Respective Patient Use Case |
|---|---|
| UC1 - Add Doctor | UC7 - Add Patient |
| UC2 - Delete Doctor | UC8 - Delete Patient |
| UC3 - Edit Doctor | UC9 - Edit Patient |
| UC4 - Find Doctor | UC10 - Find Patient |
| UC5 - List Doctor | UC11 - List Patient |
| UC6 - Assign Doctor to Patient | UC12 - Assign Patient to Doctor |
Use case: UC1 - Add Doctor
MSS
- User requests to add a doctor by specifying information about the doctor.
- Docedex confirms the addition of the doctor.
Use case ends.
Extensions
- 1a. User enters invalid command.
- 1a. Docedex detects error in command.
- 1a1. Docedex prompts user to correct the format of the command.
- 1a2. User enters command and information to add a doctor.
Steps 1a1-1a2 are repeated until a valid add command is entered.
Use case resumes from step 2.
- 1a1. Docedex prompts user to correct the format of the command.
- 1a. Docedex detects error in command.
- 1b. Docedex detects duplicate doctor entry.
- 1b1. Docedex prompts user to not enter duplicate information
- 1b2. User re-enters command to add a doctor.
Steps 1b1-1b2 are repeated until a unique entry is entered.
Use cases resumes from step 2.
- 1b1. Docedex prompts user to not enter duplicate information
Scroll back to Table of Contents
Use case: UC2 - Delete Doctor
MSS
- User requests to delete a specific doctor.
- Docedex confirms the deletion of the doctor contact.
Use case ends.
Extensions
- 1a. Docedex detects an error in the command format.
- 1a1. Docedex requests to correct the format of the command.
- 1a2. User enters command to delete a doctor.
Steps 1a1-1a2 are repeated until a valid delete command is entered.
Use case resumes from step 2.
- 1b. Docedex detects that the requested doctor does not exist.
- 1b1. Docedex alerts the user that the requested doctor does not exist.
- 1b2. User re-enters the command.
Steps 1b1-1b2 are repeated until the user enters a doctor that exists in Docedex.
Use case resumes from step 2.
Scroll back to Table of Contents
Use case: UC3 - Edit Doctor
MSS
- User requests to edit a doctor’s information by specifying the updated information.
- Docedex confirms the update of the doctor’s information.
Use case ends.
Extensions
- 1a. Docedex detects an error in the command format.
- 1a1. Docedex requests to correct the format of the command.
- 1a2. User enters command to delete a doctor.
Steps 1a1-1a2 are repeated until a valid delete command is entered.
Use case resumes from step 2.
- 1b. Docedex detects duplicate doctor entry.
- 1b1. Docedex prompts user to not enter duplicate information
- 1b2. User re-enters command to edit a doctor.
Steps 1b1-1b2 are repeated until the edited doctor does not exist in Docedex.
Use cases resumes from step 2.
- 1b1. Docedex prompts user to not enter duplicate information
- 1c. Docedex detects that the requested doctor does not exist.
- 1c1. Docedex alerts the user that the requested doctor does not exist.
- 1c2. User re-enters the command.
Steps 1c1-1c2 are repeated until the user enters a doctor that exists in Docedex.
Use case resumes from step 2.
Scroll back to Table of Contents
Use case: UC4 - Find Doctor
MSS
- User requests to find doctors that meet a particular criteria
- Docedex shows a list of doctors that meet the criteria requested by user. Use case ends.
Extensions
- 1a. Docedex detects an error in the command format.
- 1a1. Docedex requests to correct the format of the command.
- 1a2. User enters command to delete a doctor.
Steps 1a1-1a2 are repeated until a valid delete command is entered.
Use case resumes from step 2.
Scroll back to Table of Contents
Use case: UC5 - List Doctor
MSS
- User requests to list all doctors in Docedex.
- Docedex shows a list of all doctors stored. Use case ends.
Extensions
- 1a. Docedex detects an error in the command format.
- 1a1. Docedex requests to correct the format of the command.
- 1a2. User enters command to delete a doctor.
Steps 1a1-1a2 are repeated until a valid delete command is entered.
Use case resumes from step 2.
Scroll back to Table of Contents
Use case: UC6 - Assign Doctor To Patient
MSS
- User requests to assign a doctor to a patient in Docedex.
- Docedex confirms the assignment of the doctor to the patient. Use case ends.
Extensions
- 1a. Docedex detects an error in the command format.
- 1a1. Docedex requests to correct the format of the command.
- 1a2. User enters command to delete a doctor.
Steps 1a1-1a2 are repeated until a valid delete command is entered.
Use case resumes from step 2.
- 1b. Docedex detects that the requested doctor does not exist.
- 1b1. Docedex alerts the user that the requested doctor does not exist.
- 1b2. User re-enters the command.
Steps 1b1-1b2 are repeated until the user enters a doctor that exists in Docedex.
Use case resumes from step 2.
- 1c. Docedex detects that the requested patient does not exist.
- 1c1. Docedex alerts the user that the requested patient does not exist.
- 1c2. User re-enters the command.
Steps 1c1-1c2 are repeated until the user enters a patient that exists in Docedex.
Use case resumes from step 2.
- 1d. Docedex detects that the patient and doctor are already assigned to each other.
- 1d1. Docedex alerts the user that the patient and doctor are already assigned to each other.
Use case ends.
- 1d1. Docedex alerts the user that the patient and doctor are already assigned to each other.
Scroll back to Table of Contents
Appendix E: Non-Functional Requirements
- Should work on any mainstream OS as long as it has Java
11or above installed. - Should be able to hold up to 1000 doctor contacts and 1000 patient contacts without noticeable reduction in performance.
- A user with above average typing speed for regular English text (i.e. not code, not system admin commands) should be able to accomplish most of the tasks faster using commands than using the mouse.
- Should not utilize any network to transmit any information.
- The average time required to boot up the application should be under 10 seconds.
- Feedback from Docedex should be displayed within 2 seconds of the user’s input.
- The file size of the application’s
jarshould not exceed 100MB. - Should utilize less than 2GB of memory when in use.
Scroll back to Table of Contents
Appendix F: Glossary
| Term | Definition |
|---|---|
| AddressBook-Level3 | A project created by the SE-EDU initiative, which this project is based on. |
| App | An application created by the project. |
| API | An application programming interface. |
| Architecture Diagram | A diagram that explains the high-level design of the App. |
| Class diagram | A diagram that shows the classes of the App and the relationships between them. |
| CLI | Command Line Interface, for users to perform actions through typing commands. |
| CommandBox | A component of the UI that allows users to enter commands. |
| Commons | A collection of classes used by multiple other components. |
| Component | A modular part of the App that serves a specific function. |
| ContactDisplay | A component of the UI that displays contact information. |
| GUI | Graphical User Interface, a visual way for users to interact with a software program |
| Logic component | The component responsible for executing user commands. |
| Main | A class with two subclasses, Main and MainApp, that initializes and shuts down the components of the App. |
| MainWindow | The main window of the UI that houses all the UI components. |
| Model | The data model used by the App. |
| Navigability | A concept referring to instances of one class holding a reference to instances of another class. |
| PlantUML | A tool used to create diagrams. |
| ResultDisplay | A component of the UI that displays the results of commands. |
| Sequence Diagram | A diagram that shows the sequence of events between components. |
| UML | Unified Modeling Language |
Scroll back to Table of Contents
Appendix G: Effort
| Feature | AB3 | Docedex |
|---|---|---|
| Effort | 10 | 22 |
| Lines of Code | 6k | +13k |
The Docedex project involved a significant effort to adapt the AddressBook-Level3 (AB3) application to a new domain of doctors and patients. One of the major changes was the addition of two new models, Doctor and Patient, which required modifying the existing data model and the associated logic components. Another significant change was the complete redesign of the user interface using JavaFX, which required a significant amount of time and effort to learn and implement.
Firstly, although code was reused from AB3, a lot of it had to be refactored to fit our use case. We now had to deal with 2 entity types, patient and doctor, which meant that the way we stored the information also had to change. Moreover, with more attributes for both Doctor and Patient classes, it also meant more effort in validating the inputs and writing high quality test cases for each attribute, an extremely time-consuming process.
The most significant challenge was to map a many-to-many relationship between doctors and patients during assignment. To solve this, the team decided to create a list of patients inside each Doctor instance (and vice versa for patients). This change required us to modify multiple components to update the lists after patient assignment and display them onto the UI.
Our work on implementing the assignment feature is the most prominent in the AssignDoctorCommand and AssignPatientCommand, and their relevant parsers and model methods.
Another challenge was redesigning the interface to display more information. Changing the interface of an application can be a major undertaking. In the case of Docedex, this involved designing new UI components, updating existing components to reflect the new models and data, and potentially creating new navigation and layout structures to support the new workflows. Significant time was taken to learn JavaFX and implementing the components to fit Docedex use cases.
We even tried to add test cases to the UI, following AB4 example closely. This can be seen in an open pull request which we have intentionally chosen to not merge because we felt that the complexity in implementing the test cases extended beyond the objectives of the module, and we did not want to submit half completed work.
Scroll back to Table of Contents
Appendix H: Instructions for manual testing
Given below are instructions to test the app manually.
Launch and shutdown
-
Initial launch
-
Download the jar file and copy into an empty folder
-
Double-click the jar file
Expected: Shows the GUI with a set of sample contacts. The window size may not be optimum.
-
-
Saving window preferences
-
Resize the window to an optimum size. Move the window to a different location. Close the window.
-
Re-launch the app by double-clicking the jar file.
Expected: The most recent window size and location is retained.
-
-
Exiting the app
- With the app still open, enter
exitin the command box or click on the close window button.
Expected: The app closes.
- With the app still open, enter
Scroll back to Table of Contents
Adding a doctor
-
Adding a doctor
-
Test case:
add-doc n/John Doe p/98765432 e/johnd@example.com s/Cardiology y/5 t/surgeon
Expected: New doctor added. Command Success status message shown with doctor details. -
Test case:
add-doc n/John Doe p/98765432 e/johnd@example.com s/Cardiology y/5 t/surgeon(Existing doctor with same parameters has already been added)
Expected: No doctor added. Duplicate doctor error message shown. -
Test case:
add-doc n/John Doe
Expected: No doctor added. Error message shown in the status message.
-
Scroll back to Table of Contents
Adding a patient
-
Adding a patient
-
Test case:
add-ptn n/John Doe p/98765432 e/jdoe@gmail.com h/1.85 w/70.5 d/Fever st/Outpatient r/Patient was given paracetamol for fever t/friends
Expected: New patient added. Command Success status message shown with patient details. -
Test case:
add-ptn n/John Doe p/98765432 e/jdoe@gmail.com h/1.85 w/70.5 d/Fever st/Outpatient r/Patient was given paracetamol for fever t/friends(Existing patient with same parameters has already been added)
Expected: No patient added. Duplicate patient error message shown. -
Test case:
add-ptn n/John Doe
Expected: No patient added. Error message shown in the status message.
-
Scroll back to Table of Contents
Deleting a doctor
-
Deleting a doctor while all doctors are being shown
-
Prerequisites: List all doctors using the
list-doccommand. Multiple doctors in the list. -
Test case:
del-doc 1
Expected: First doctor contact is deleted from the displayed doctors list. Details of the deleted contact shown in the status message. -
Test case:
del-doc 0
Expected: No doctor is deleted. Error details shown in the status message. -
Test case:
delete
Expected: No doctor is deleted. Unknown command error shown in the status message. -
Test case:
del-doc a
Expected: No doctor is deleted. Error details shown in the status message. -
Test case:
del-doc x(where x is larger than the doctor list size)
Expected: No doctor is deleted. Invalid index error shown in the status message.
-
-
Deleting a doctor while doctor list is filtered
-
Prerequisites: Filter doctors using the
find-doccommand. At least one doctor must be in the doctor list. -
Test case:
del-doc 1
Expected: First doctor contact in the filtered doctor list is deleted. Details of the deleted contact shown in the status message. -
Test case:
del-doc x(where x larger than the filtered doctor list size, but smaller than the unfiltered doctor list fromlist-doccommand)
Expected: No doctor is deleted. Invalid index error shown in the status message. -
Other test cases to try:
delete,del-doc 0,del-doc a. Expected: Similar outputs as deleting a doctor while all doctors are being shown.
-
Scroll back to Table of Contents
Deleting a patient
-
Deleting a patient while all patients are being shown
-
Prerequisites: List all patients using the
list-ptncommand. Multiple patients in the list. -
Test case:
del-ptn 1
Expected: First patient contact is deleted from the displayed patients list. Details of the deleted contact shown in the status message. -
Test case:
del-ptn 0
Expected: No patient is deleted. Error details shown in the status message. -
Test case:
delete
Expected: No patient is deleted. Unknown command error shown in the status message. -
Test case:
del-ptn a
Expected: No patient is deleted. Error details shown in the status message. -
Test case:
del-ptn x(where x is larger than the patient list size)
Expected: No patient is deleted. Invalid index error shown in the status message.
-
-
Deleting a patient while patient list is filtered
-
Prerequisites: Filter patients using the
find-ptncommand. At least one patient must be in the patient list. -
Test case:
del-ptn 1
Expected: First patient contact in the filtered patient list is deleted. Details of the deleted contact shown in the status message. -
Test case:
del-ptn x(where x larger than the filtered patient list size, but smaller than the unfiltered patient list fromlist-ptncommand)
Expected: No patient is deleted. Invalid index error shown in the status message. -
Other test cases to try:
delete,del-ptn 0,del-ptn a. Expected: Similar outputs as deleting a patient while all patients are being shown.
-
Scroll back to Table of Contents
Editing a doctor
-
Editing an existing doctor
-
Prerequisites: Filter doctors using
find-doccommand or list all doctors usinglist-doccommand. At least one doctor must be in the doctor list. -
Test case:
edit-doc 1 n/Bob
Expected: Name of first doctor contact in the filtered doctor list changed to Bob. Command success status message shown with new doctor details. -
Test case:
edit-doc 0 n/Bob
Expected: No doctor is edited. Invalid doctor index error shown in status message. -
Test case:
edit-doc x n/Bob(where x is larger than doctor list size)
Expected: No doctor is edited. Invalid doctor index error shown in status message. -
Test case:
edit-doc 1
Expected: No doctor is edited. Missing field error shown in status message.
-
Scroll back to Table of Contents
Editing a patient
-
Editing an existing patient
-
Prerequisites: Filter patients using
find-ptncommand or list all patient usinglist-ptncommand. At least one patient must be in the patient list. -
Test case:
edit-ptn 1 n/Bob
Expected: Name of first patient contact in the filtered patient list changed to Bob. Command success status message shown with new patient details. -
Test case:
edit-ptn 0 n/Bob
Expected: No patient is edited. Invalid patient index error shown in status message. -
Test case:
edit-ptn x n/Bob(where x is larger than patient list size)
Expected: No patient is edited. Invalid patient index error shown in status message. -
Test case:
edit-ptn 1
Expected: No patient is edited. Missing field error shown in status message.
-
Scroll back to Table of Contents
Assigning a patient to a doctor
-
Assigning a patient to a doctor
-
Test case:
assign-ptn ptn/1 doc/1(where patient at index1is not assigned to doctor at index1)
Expected: Patient at index1is assigned to Doctor at index1. Command success status message with patient and doctor names shown. -
Test case:
assign-ptn ptn/1 doc/1(where patient at index1is already assigned to doctor at index1)
Expected: No assignment done. Already assigned error shown in the status message. -
Test case:
assign-ptn ptn/0 doc/1Expected: No assignment done. Error details shown in the status message. -
Test case:
assign-ptn ptn/1 doc/0Expected: No assignment done. Error details shown in the status message. -
Test case:
assign-ptn 1 1Expected: No assignment done. Error details shown in the status message. -
Test case:
assign-ptn ptn/x doc/1(where x is larger than patient list size)
Expected: No assignment done. Invalid patient index error shown in the status message. -
Test case:
assign-ptn ptn/1 doc/x(where x is larger than doctor list size)
Expected: No assignment done. Invalid doctor index error shown in the status message.
-
Scroll back to Table of Contents
Removing an assignment of a patient from a doctor
-
Removing an assignment of a patient from a doctor
-
Test case:
unassign-ptn ptn/1 doc/1(where patient at index1is assigned to doctor at index1)
Expected: Assignment of Patient at index1from Doctor at index1removed. Command success status message with patient and doctor names shown. -
Test case:
unassign-ptn ptn/1 doc/1(where patient at index1is not assigned to doctor at index1)
Expected: No unassignment done. Not assigned error shown in the status message. -
Test case:
unassign-ptn ptn/0 doc/1Expected: No unassignment done. Error details shown in the status message. -
Test case:
unassign-ptn ptn/1 doc/0Expected: No unassignment done. Error details shown in the status message. -
Test case:
unassign-ptn 1 1Expected: No unassignment done. Error details shown in the status message. -
Test case:
unassign-ptn ptn/x doc/1(where x is larger than patient list size)
Expected: No unassignment done. Invalid patient index error shown in the status message. -
Test case:
unassign-ptn ptn/1 doc/x(where x is larger than doctor list size)
Expected: No unassignment done. Invalid doctor index error shown in the status message.
-
Scroll back to Table of Contents
Finding a doctor
-
Finding a doctor with specific parameters
-
Test case:
find-doc n/BobExpected: All doctor contacts with the name containingBobis filtered and shown. Command success status message shown with number of doctors listed (can be 0 if no valid doctors found). -
Test case:
find-doc t\surgeonExpected: All doctor contacts that contains tagsurgeonis filtered and shown. Command success status message shown with number of doctors listed (can be 0 if no valid doctors found). -
Test case:
find-docExpected: No change to doctor list. Error details shown in the status message. -
Test case:
findExpected: No change to doctor list. Unknown command error shown in the status message.
-
Scroll back to Table of Contents
Finding a patient
-
Finding a patient with specific parameters
-
Test case:
find-ptn n/BobExpected: All patient contacts with the name containingBobis filtered and shown. Command success status message shown with number of patients listed (can be 0 if no valid patients found). -
Test case:
find-ptn t\pendingReviewExpected: All patient contacts that contains tagpendingReviewis filtered and shown. Command success status message shown with number of patients listed (can be 0 if no valid patients found). -
Test case:
find-ptnExpected: No change to patient list. Error details shown in the status message. -
Test case:
findExpected: No change to patient list. Unknown command error shown in the status message.
-
Scroll back to Table of Contents
Listing all doctors
-
Listing all doctors while Docedex is showing only filtered doctors
-
Prerequisite: At least one doctor has been added to Docedex. Doctor list is being filtered using
find-doccommand orspcommand. -
Test case:
list-doc
Expected: All doctors in Docedex are shown. Command success status message shown. -
Test case:
list
Expected: No change to doctor list. Unknown command error shown in the status message.
-
Scroll back to Table of Contents
Listing all patients
-
Listing all patients while Docedex is showing only filtered patients
-
Prerequisite: At least one patient has been added to Docedex. Patient list is being filtered using
find-ptncommand orsdcommand. -
Test case:
list-ptn
Expected: All patients in Docedex are shown. Command success status message shown. -
Test case:
list
Expected: No change to patient list. Unknown command error shown in the status message.
-
Scroll back to Table of Contents
Selecting a doctor
-
Selecting a doctor from doctor list using index
-
Prerequisites: Filter doctors using
find-doccommand or list all doctors usinglist-doccommand. At least one doctor must be in the doctor list. -
Test case:
sd 1
Expected: First doctor in doctor list is selected. The doctor’s details are shown in the enlarged contact card. Patient list filtered to Patients assigned to selected doctor. Command success status message shown with doctor’s details. -
Test case:
sd 0
Expected: No new doctor selected. Error details shown in the status message. -
Test case:
sd x(where x is larger than the filtered doctor list size)
Expected: No new doctor selected. Invalid index error shown in the status message. -
Test case:
sd
Expected: No new doctor selected. Error details shown in the status message.
-
Scroll back to Table of Contents
Selecting a patient
-
Selecting a patient from patient list using index
-
Prerequisites: Filter patients using
find-ptncommand or list all patient usinglist-ptncommand. At least one patient must be in the patient list. -
Test case:
sd 1
Expected: First patient in patient list is selected. The patient’s details are shown in the enlarged contact card. Doctor list filtered to doctors assigned to selected patient. Command success status message shown with patient’s details. -
Test case:
sd 0
Expected: No new patient selected. Error details shown in the status message. -
Test case:
sd x(where x is larger than the filtered patient list size)
Expected: No new patient selected. Invalid index error shown in the status message. -
Test case:
sd
Expected: No new patient selected. Error details shown in the status message.
-
Scroll back to Table of Contents
Saving data
-
Dealing with missing/corrupted data files
-
Prerequisite: Have opened and closed the application and confirmed that the files
data/docedex.jsonhave been created in the same directory that docedex was run from. -
Manually edit the file
data/docedex.jsonwith any text editing software to break the JSON format or edit the keys of JSON file. Alternatively, you may delete thedata/docedex.jsonfile. -
Re-launch the app.
-
Test case:
data/docedex.jsonwas deleted.
Expected: Docedex starts with empty doctor and patient list. All contacts have been deleted. -
Test case:
data/docedex.jsonwas corrupted.
Expected: Docedex starts with empty doctor and patient list. All contacts have been deleted.
-
Scroll back to Table of Contents